Freebies My Classroom About Me Home Instagram TeachersPayTeachers Pinterest Email Facebook BlogLovin Image Map
Showing posts with label physical education. Show all posts

September 14, 2017

Reforming Physical Education: What's Next

As I've become more active on Twitter, I'm learning that there are a lot of people out there asking the right questions, but not a ton of people wither have the answer or are willing to provide it. What sparked my interest most recently was a shared tweet from Adam Lleva {@MrAdamPE} regarding an article titled School PE is Part of the Childhood Obesity Problem by Niall Moyna. Naturally from the title of the article, I was immediately defensive. Here's another "expert" who knows nothing about what physical education actually is, how we teach it, or why what we do matters. Against my better judgment, and mainly because Adam shared it, I decided to give it a read anyway. I'm glad I did because it raised some very important questions that I think have realistic and attainable answers.

Did you read the article? It starts off identifying what those of us in the physical education realm already know - our students are not meeting minimum requirements of physical activity to maintain health. We can relate this to a few factors, but one that the author names directly seems to have had the greatest impact - increased screen time. He cites a study from Irish Life Health indicating that 98 percent of parents admitted to their children having daily screen time of some kind. While this is the only direct link Moyna discusses, there are many other contributing factors to the rise in childhood obesity, most directly their nutritional intake. Processed foods and fast food are dominating the menu of busy working families. Combine this downward trend in food quality to increased sedentary time and we've got a caloric balance issue that is impact millions of children every day.

So what is the authors call for change? Start with the schools and how we're educating our students on healthy habits. Where do these changes happen? Health and physical education. He makes an argument I can support fully, "If our children were leaving school unable to perform basic mathematics, we would examine the mathematics curriculum without delay. Why, when too many of our children are leaving school overweight, unfit, and destined for a life of ill-health, are we not challenging what they are being taught in PE?"

Niall, I've got a few of those answers to that question. First, it's a great question and the answers are going to be frustrating to read for those of us who know why reform needs to happen (and why it hasn't happened yet).

  1. Education and training for professionals in the field. Colleges and universities across the US are cutting their teacher training programs for health and physical education. Departments are closing and often being forced to move to smaller schools and communities. In Richmond, VA - Virginia Commonwealth closed their health and physical education training program simply because the department chair was retiring and they could find no one to fill it. Two years later, that same program is now up and running again thanks to some very passionate advisers and educators. Additionally, many professionals are trained to teach using the sports-based model. We love team sports, great! The switch, however, needs to be made to a skills-based model of teaching. Simply put, instead of teaching football for two weeks and limiting our students to one sport, one ball, and one version of a throwing mechanic, we should transition to a throwing unit where students can experience multiple games, sports, and activities using throwing technique. I'll be writing another blog post down the road about the benefits of the skill-based model so stay tuned! This is very simply put as the benefits of the skills-based model are enormous, but for the sake of this post, I'll leave it at that.
  2. School districts across the US are cutting physical education time or cutting programs all together. Most elementary students receive PE once a week and one 15-20 minute recess a day. Secondary students are mostly receiving physical education every other day, but wait... they also take health. Some schools function on a semester style system that has students in physical education for the one semester and health for another. Other schools function on a rotation schedule between health one week and physical education the next or a two week switching pattern. In my current school, sixth and seventh grade students have HPE every other day for 90 minutes, but every two weeks they are in health for those 90 minute class periods. We know that our health curriculum is just as important as our physical education curriculum... do you see the conundrum yet? Many teachers, especially at the elementary level, have adapted to teaching health concepts with physical education concepts in the gym. I have seen brilliant methods designed by educators who smoothly convince third graders that their soccer balls are red blood cells moving through their veins and arteries, while the playground balls are white blood cells that defend the body from diseases, while the taggers are viruses trying to infiltrate the body. Brilliant, right? Sadly, not all educators are this creative. More educators need to invest in professional development opportunities, but that's easier said than done given how expensive conferences can be, especially if you have children of your own. Reforming the curriculum is a great idea, but what good does it do if programs are continuing to be cut?
  3. Programs are being cut for many reasons and I believe that people don't know exactly what we do as physical educators. The most important question I have is this... How can we convince districts to invest the man power and money needed to have proper curriculum reform when we can't get them to respect what we teach? Secondly, once we've convinced our districts to change, how can we then move reform up to the state level? These are the tough questions and the only answer I have is advocacy. We have to be advocates for what we teach every single day, in every single class, outside of school, when communicating with parents, when interacting with other educators, when interacting with peers... I could make this list go on endlessly. We have to advocate our purpose and why our subject is valuable 24/7. We have to stop tying in why we're valuable to other subjects while we're at it. Do you think math teachers justify their importance by how their subject helps English? No! So why are we!? Yes, increased physical activity improves academic performance, but that one fact does not define our purpose or what we do! Physical education and health education are important subjects on their own. We don't need to justify what we do by how it impacts other subjects. I bought into the idea for the longest time that the impact physical activity has on academic performance was the game changer in justifying physical education in schools. I listened to a life changing speech at the Virginia Association for Health, Physical Education, Recreation, and Dance in November 2016 by the keynote speaker, Dr. John Almarode, from James Madison University. My favorite quote from the amazing keynote was something to the effect of, "Why are you saying that your class benefits students in math? What if they have a bad math teacher? Do you want to be responsible for that outcome?" MIND BLOWN. Of course I don't want to be responsible for that. He then talked to us about how to appropriately advocate for what we do because what we do is valuable. We have some of the biggest impact on students life outcomes. Health and wellness is knowledge they will need for the rest of their lives. What we do matters and we can get people to listen to us and invest in us by advocating appropriately.
  4. We have little to no control over what our students do outside of school. This is the primary factor as to why physical education, no matter how amazing, simply will never be enough to end childhood obesity. We can't control what our students parents allow them to do outside of school. We can teach them to be competent in every activity known to man, we can teach them how to eat well, we can teach them life skills, we can teach them until we are blue in the face... But until parents and families decide to make changes in their lifestyles, habits won't change. I can get a kid moving for 90 minutes every other day. I can't change the fact that when the same child goes home, he's allowed to eat whatever junk food he wants while he sits and plays video games all night. We've all heard the colloquial phrase, "You can lead a horse to water, but you can't make it drink." If mom and dad are still feeding them pizza every night or stopping at McDonald's four times a week, I can't fix that. I had a student once who brought 24 chicken wings for lunch every single day. When it came time for PE, he wanted to move, he wanted to play! He was a great kid and the type of student who was willing to try anything, but he could not overcome his diet and his lifestyle at home. Nothing I did could possible change that. It's an issue with the way society and culture have changed. Despite this inhibiting factor, you can bet that I will keep teaching until I'm blue in the face because hopefully one day, enough of these students will have learned the right way to be active and the right way to eat and there will be a cultural shift. That is the ultimate goal!
I am very fortunate to teach in Virginia. We have some of the best schools in the country and our learning standards (known as SOLs) are better than most. I'm also fortunate to be part of the curriculum team for my county. Is our curriculum perfect? Of course not, but it's definitely better than it was two years ago! Even if the curriculum wasn't perfect, there are always going to be educators (in any subject area) who intentionally or unintentionally don't follow the curriculum. Some of our own are perpetuating the "old PE" methodology in class and it hurts those of us attempting to move the profession forward.

Many counties throughout the country struggle with change. Prior to teaching in my home state, I taught in North Carolina for two years where the standards were very different. Thankfully, due to working for a charter school, I was able to have some flexibility in what I was teaching. Being a first year teacher, I had the opportunity to create my own curriculum for both health and physical education. I had an executive director who went to school for health and physical education and was incredibly supportive of my program. Small town politics got in the way and when he left, the new director did not hold the same value for health and PE. Our program suffered and I began hitting a constant wall of "No's" for things as simple as consistently teaching a health curriculum that had been previously approved.

While I agree with what the author, Niall, is saying, I don't think curriculum reform is the only piece to the puzzle. In fact, I think there are many other obstacles that need to be tackled in order to make solid, attainable curriculum reform possible. As physical educators, we can be the vehicles of the change we wish to see. The road won't be easy and it won't be pretty, but think of the change we could make if we try? In order to see these goals come to fruition, we have to start giving our all to our programs.

What to hear more? Join the discussion on Twitter @jessbaylissPE

January 24, 2017

Brain Breaks Breakdown!

It is that time of year again! Whether you’re in elementary, middle, or high school, students are spending more time inside and less time moving. In elementary school, a lot of students are missing outdoor recess due to cold temperatures or bad weather. Middle and high school students often feel sluggish or tried from lack of sleep and less movement throughout their day. We as educators can do something about this by incorporating brain breaks into our classrooms!

     Brain breaks are kind of my thing. I have worked as a summer camp counselor or director for seven summers after attending camps as a child for 10 years. I teach physical education and I coach… I HAVE A TON OF BRAIN BREAK MATERIAL.

     Before we dive in I have what I believe is an important question… WHY do teachers think brain breaks will only benefit elementary students?! Do not get me wrong, brain breaks are perfect for elementary students, but they are just as beneficial for middle and high school students! I am a middle school educator myself and when I’m in a 90 minute health class, I try to incorporate at least three five minute brain breaks. My students tell me all the time how much they enjoy them and how their other teachers don’t perform them. Middle school teachers listen up, YOUR STUDENTS WANT BRAIN BREAKS.

Let’s get started with some of my favorite web-based brain breaks! Some of these are pretty standard, especially at the elementary level, but you can incorporate them into middle school too.


  1. Go Noodle – My adapted PE students LOVE using this website. They have so much variety! This is also a huge hit with many of my elementary teacher friends. It offers guided dance, sing-a-long, fitness, sport skills review, silly random videos, and so much more!
  2. Brain Pop – When limited on space due to larger class sizes or being crammed into a space that doesn't allow for a ton of movement, Brain Pop is a great review tool and helps kids have fun while learning. While not a true brain break, it does still offer many tools that make students feel like they're taking a breather.
  3. Just Dance YouTube Chanel – I was surprised to learn that middle school students can still love Just Dance! They love requesting songs, getting up and moving, while singing along. I have had this work really well in sixth grade, while seventh is hit or miss, and eighth graders are typically past it.
Let's get into the fun part... Brain Break ideas to implement in your classroom! Below is a detailed list of brain breaks I use (and my students love) on a regular basis {in middle school}:

  1. Yoga – What I love about yoga as a brain break is the calming effect it has on students, while challenging them to build strength in different poses. While this isn't a huge movement activity, it helps students refocus to improve classroom work and effectiveness. Being a Pinterest queen, there is an excellent resource here on yoga poses for younger students. Middle and high schools students can easily perform more advanced yoga poses which can be found here.
  2. Meet Me in the Middle  – Have students pair up with a partner and stand on opposite sides of the room. Call out an activity to do (i.e. meet in the middle and give your partner a high five with your right hand). Students walk to the center and meet their partner to do the activity. After completing the activity, students turn and walk back to their original places. Add one activity each round. {For example: 1st time – meet partner in the middle and do a right-handed high five. 2nd time – right-handed high five, add left-handed high five. 3rd time – right-handed high five, left-handed high five, call out favorite physical activity}. Adjust this activity to fit your needs and what your students enjoy. I will often add things like, "meet in the middle and perform five body squats" to make the activity more challenging.
  3. 10 Second Fitness  –  Students pair up with a partner and perform the teacher-designated fitness activity (see examples below) for 10 seconds. As one student performs the activity, the other partner counts the number of repetitions. The students switch, and partner two does the activity. Ask students to do the activity as quickly as they can. Exercise examples include:

              Forward straddle jump
              Side straddle jump
              Side jumps
              Front and back jumps
              Right foot jump
              Left foot jump
              Scissor jump
              Alternating Lunges
              Body Squats
  4. Group Juggle  –  Students should group up in table groups of 4-5 members and each group should have a small ball or object to throw and catch. On the signal, groups must work together to pass the ball to every member of their group without repeating. Once they complete the task, they should jump up and say "finished." Alternate this activity by having groups throw in the same pattern backwards, repeat the forward pattern for time, add a second object to throw, etc.
  5. Trainwreck  –  Have the entire class sit in a circle with one student in the middle. The student in the middle can either say a fun fact about themselves or a fun fact they learned in class. Students who agree or like the same thing will stand up and find a new place to sit. They cannot move directly next to their current seat or return to the same seat. The last student left is the new middle man. Repeat rounds as needed.
  6. Hot Tamale  –  One student exits the classroom. The rest of the class watches the teacher hide the “hot tamale” (can be any object) somewhere in the classroom. The student who exited the classroom re-enters. The rest of the class tries to guide him or her to the hidden tamale by performing various physical activities {listed below}, with each activity corresponding to a different direction. Students are not allowed to talk. Once the student locates the hidden “hot tamale,” another student is selected to exit the classroom, and the “hot tamale” is hidden in another location so that the game can be repeated.

    Write the following motions on the board for all students to see:
              Move backwards - back stroke (swimming motion)
              Move forward - march in place
              Move to either side - side stretch in the direction of the hot tamale
              Up higher - climbing ladder motion
              Down lower - squats
              Within 1 foot of the tamale - students pretend they are stepping on hot coals (in place) 
These examples are just a few of the brain breaks I have done with middle school students and they are also some of their favorites as well! Brain breaks don't have to be limited to elementary students. Many middle schools and most high schools operate on block schedules that keep kids in one class for a longer period of time. Taking five to 10 minutes out of our class period to get them moving and refocused will help us as educators in the long run with behavior management and it will help students be more focused and attentive. 

Do you have any go-to brain breaks that you use in your classroom!? Share your ideas in the comment section below!

January 17, 2017

Valentine's Link Up: All Subjects Welcome!

I'm not sure about y'all, but this school year is flying by! I cannot believe we are less than a month away from celebrating Valentine's Day! After a successful Christmas product link up, I want to continue the trend this week by hosting my second link up with a Valentine's Day product theme!

All you have to do is find your favorite Valentine's Day products, copy the link to your store, and share below! Share as many links as you'd like, but I humbly ask that you share at least one freebie so we can promote our stores while saving other teachers some green.

Please feel free to share my blog link with other TpT sellers or teachers who are looking for awesome Valentine's Day classroom resources! I hope each of you find resources you can utilize in your classrooms! You can follow me on twitter and instagram @sassypeteach for my latest product updates! You can also check out my store in the top banner for some awesome Valentine's Day resources (with more coming soon)! Have an amazing week teacher friends!

January 10, 2017

How to Teach a Middle School Bowling Unit

Bowling is an excellent indoor recreation sport that allows students to learn more about skill-related fitness components, as well as etiquette, sportsmanship, and cooperative skills! There is no better time to teach bowling than right now in the cold of winter. Your classes are already indoors and in most cases, you're forced to combine with other classes due to limited space. Bowling is a wonderful sport that can accommodate each of these circumstances while still getting students moving and grooving! So if you're looking for advice on how to start your own bowling unit or if you're looking for new ideas to spice up your existing unit, then keep reading! If you're looking for an awesome freebie, you'll find access to my manual scoring assessment at the end of this post!

Before Getting Started:

It's important to analyze your equipment and potential equipment needs before beginning any unit in your classroom. It's also essential to be creative, especially if you don't have "real" bowling equipment. My school is very fortunate to have access to authentic bowling pins for 10 lanes, 10 rubber or plastic bowling balls {I do not recommend purchasing plastic bowling balls - more on that later}, and mats that act as bumpers at the far end of each lane. Your school may not have this equipment (and I've been there before) so you may need to be more creative.

If you have bowling equipment already, fantastic! If you don't currently have bowling equipment, but you have the resources to purchase equipment, here are my top recommendations for bowling equipment:

Pins:

Balls:
Complete Sets:
You can certainly find cheaper options, but what I love about Gopher is their lifetime replacement guarantee. When an item breaks or wears down, they will replace it, no questions asked. My department chair and I do this frequently. Flag House also has the widest variety of options.

I'm sure some of you are looking at these prices and thinking, "Wow, these all look great, but I simply don't have the budget to purchase these items!" You're in luck because there are a ton of items you probably already have in your storage closet that can be just as effective!

Courtesy of Pinterest
https://www.pinterest.com/pin/285204588875182233/
Creative Pin Suggestions:
  • Empty 2-Liter Bottles
  • Paper Towel Rolls (glue three together to help them stand better)
  • PVC Pipe (cut in 10-15 inch lengths)
  • Wide Pool Noodles (cut in 10-15 inch lengths)

Courtesy of S&S Worldwide
www.ssww.com


Creative Ball Suggestions:
  • Traditional Foam Balls (best suggestion)
  • Soccer Balls (size four works best)
  • Basketball (not ideal as they can be too big for students hands)
Setting Up Your Bowling Unit:

This will vary based on your school, your PE/Health rotations and other factors, but my department works in a two week block schedule format. This allows me to teach five 90-minute lessons during each PE rotation. I breakdown my skill development into each of the five days:
  • Day 1: Introduction to Basic Skills & Vocabulary, Peer Evaluation
  • Day 2: Review Basic Skills, Station Skills, Self-Assessment
  • Day 3: Station Skills, Introduce Manual Scoring, Peer Assessment
  • Day 4: Traditional Bowling, Manual Scoring Skills, Self-Assessment
  • Day 5: Summative Skill Assessment, Summative Manual Scoring Assessment

In my 90-minute class periods, I eliminate 14-20 total minutes (before and after class) for changing and instant activity (before class only). I also include a 10-20 minute fitness activity before getting into the main topic, in this case bowling, which gives me about 50 minutes to teach content. You can easily manipulate these times to work with your own schedule. At my former school, I had 50 minute class periods. I eliminated 12 minutes for students to change (includes before class - 6 min - and after class - 6 min) and that left approximately 38 minutes for content. If your schedule is closer to this time frame, I eliminate a fitness activity when bowling because it requires so much setup throughout the activity. 

Day One | Introduction to Basic Skills

I focus on ball grip and a three step approach during day one. Educators differ on the type of approach taught, but as long as students are releasing the ball with the opposite (or non-dominant) foot in front, the number of steps in the approach can vary. After brief instruction and demonstration, I break students into groups of four.

To the left is the setup I use in my own classroom. We have 10 lanes set up in our gym with four students at each lane. Two students begin at the top of the lane as the bowlers, while the other two begin at the bottom of the lane . (1) Bowler one rolls their first bowl, with bower two providing verbal feedback on hand grip and three step approach. (2) The two team members on the bottom of the lane, move pins that have been knocked over to the side. (3) Bowler one then bowls their second ball, with bowler two again providing verbal feedback. (4) The two team members reset the pins so all ten are standing. (5) Bowler two now takes their turn, with all other steps repeating. (6) Once bowler two has finished, they move to the bottom of the lane for pin setup, while the previous team members move to the top of the lane to bowl their turns.

As the instructor, I am moving around with each group to fix form, provide formative feedback, and check for understanding. If I see a pattern of errors or misunderstanding, I will stop the group, briefly explain the issue, get them working again, and then go back to working with students one on one. 

I also have a peer evaluation form. Each student fills out a form about the partner they observed bowling with helpful, respectful, and constructive feedback.

Day Two | Review Basic Skills, Station Skills, Self-Assessment

Prior to class, I would have reviewed peer feedback. After my students have completed the instant activity and fitness activity for the day, I quickly review and demonstrate the basic skill learned in day one and hand back their peer feedback from the previous class. On day two, I add station task cards to each lane. Students work through various setups throughout class and track their progress. For example, a station task card looks like:


Each student is given a worksheet to track which stations they have visited and how they did. Students think it's fun to work on different shots. This worksheet becomes their self-assessment later on when they review it before turn in. I grade the sheet for completion, provide feedback, and give it back during the next class period.

Day 3 | Station Skills, Introduce Manual Scoring, Peer Assessment

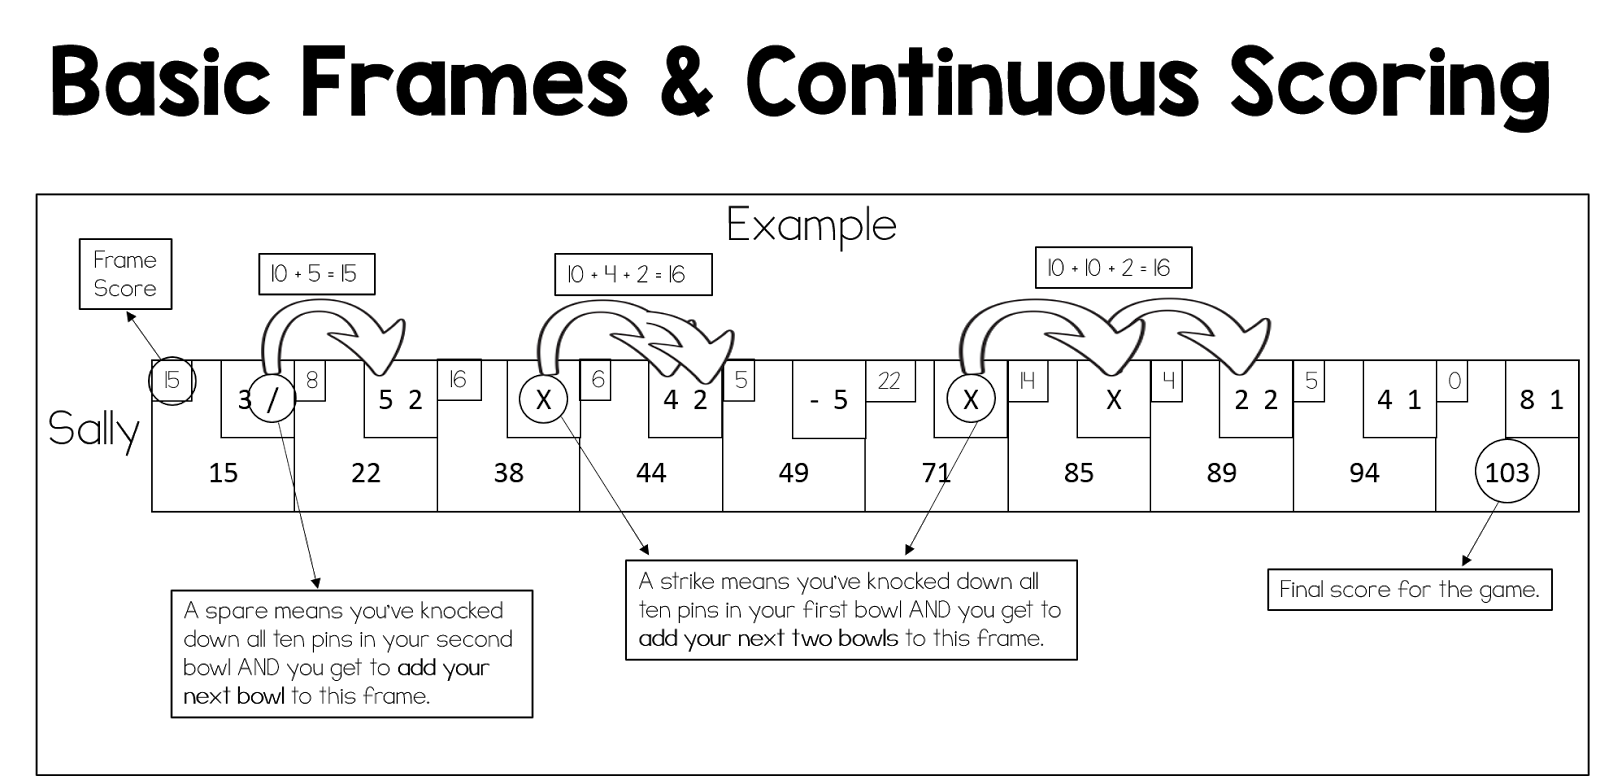
Students continue to work on stations, often returning to station they've struggled with. There is a station for every group and the general rule is that if a station is occupied, they must select another station. This is also the day I introduce manual scoring. Students often have no idea how scoring in this sport works because they've never had to track it themselves. I start by teaching basic frames and continuous scoring.


Introducing spares and strikes is often a skill I wait to introduce until seventh or eighth grade, but only you know your classes! If you think they can take those skills on sooner, I have this visual to assist students with understanding them.


Day 4 | Traditional Bowling, Manual Scoring Skills, Self-Assessment

On day four of my bowling unit, I take away the stations and let students practice their new skills in a traditional bowling environment. Students also keep track of their own scores and apply their scoring knowledge in a formative setting. 

My role on day three is to facilitate feedback, assist with scoring, provide opportunities to challenge students, and collect/review bowling score cards. I print my scorecards from Print Your Brackets. They are easy to print and perfect for classroom use!

Day 5 | Summative Skill Assessment, Summative Manual Scoring Assessment

Day five is assessment day and I have been notifying my students about this every day leading up to it. My assessment style is informative and, in my opinion, always students to test in a comfortable environment without fear of making mistakes. 

Skill Assessment: I allow students to pick their own groups and lane. I move to the students lane, inform them that I will be assessing their next bowl, notify them what I am looking for, and allow them two opportunities to find success. I place my criteria on an Excel Spread sheet with each students name pre-entered and fill in their results as I record them. I assess with a simple yes or no system. The individual skill is either present or not. If the skill is present, it is marked with a Y and if it is not present or incomplete, it is marked with a N.

Scoring Assessment: Students complete a pre-filled scoring sheet for four bowlers. I give my students the option on which scores they would like to tally. For example, in my assessment, I ask students to complete two of the four scores. They must score Corey or Emily as one of the two options and Michael or Patricia as the second option.

I also tell my students that if they want to work through all four, I will count their best two. I award one point per frame. I also grade based off the individual frames. 

For example, if a student is working on Corey and scores 9 on frame one (correct), 19 on frame two (incorrect), and 27 on the third frame (half correct), they would earn two total points. They answered frame one correctly (+1), but answered frame two incorrectly (+0). They technically answered frame three correctly as the frame score is 8, but now they've based it off their incorrect score in frame two. They receive a point because they scored that frame correctly. You can access a copy of my scoring assessment and answer key for free in my store! While you're there you can also see my Bowling Classroom Newsletter to help keep parents updated on the latest class events!

And there you have it! This is how I like to run my own middle school bowling unit. Tell me what you think or show me how you run your own bowling unit! I love to see how other physical educators are teaching in their classrooms. If you have any questions, please don't hesitate to shoot me an e-mail at sassypeteach@gmail.com! Also be sure to follow me on twitter and instagram @sassypeteach as I'll be teaching my bowling unit over the next two weeks!

January 3, 2017

Athlete-Centered Coaching & Why It Matters for Our Student Athletes

Anyone who knows my educational background knows that I attended the University of Virginia for my graduate degree. While I was there I had the opportunity to meet many intelligent and talented individuals. I'm thankful to consider Marshall Milbrath a colleague, as well as a friend, and his latest research piece really spoke to me on multiple levels. In education, we hear about student-centered classrooms all the time. Many educators, especially at the middle and high school level, dedicate their after school time to impacting students in athletics as coaches. Too often I see this idea of student-based instruction and learning fade to the background when transitioning to the athletic field, but why? We know students are more engaged, enticed, and willing to learn when they have control of that learning, so why are we abandoning it on the sports field, especially when research is leading us to the same conclusion?
While it has been suggested that research must continue to develop a working definition of athlete-centered coaching, common methods recognized as athlete-centered practices have been identified. This review describes some of these approaches taking into account scientific findings from a multitude of sports contexts, rationales for why these should be considered by the track coach in her or his practice, and recommendations for its implementation.  - Milbrath (2017). 
If you really want to dive into the research behind athlete-centered coaching, I highly recommend reading Marshall's article (linked above), but for this post I want to talk about real athlete-centered strategies that middle and high school coaches can implement right now. Before we get there, it's important to understand what athlete-centered coaching is and Marshall summed it up like this, "The athlete-centered approach breaks away from negative articulations in coaching, while reducing the prevalence of autocratic, “win-at-all cost” mentalities common in many sporting contexts. Athlete-centered coaching adopts an attitude of facilitation and teaching. By focusing on teaching the mind, body, and spirit of the athlete, humanistic needs are fulfilled and athletes are empowered."

So how can we adjust our coaching styles to better our athletes in an athlete-centered environment right now?

  1. Understand Your Audience: Our athletes, their goals, the team atmosphere, and so many other factors change every year. If we want our approach to be athlete-centered, we have to adapt how we lead our team each year. Even if our team has many returning players, those few loses or new additions make it a completely different team. This leads into...

  2. Get to Know Your Athletes: Even at the middle school level, I use a short and simple personality test with each of my athletes. This accomplishes two major tasks, I get to know them and they get to know themselves. When athletes are more self-aware of their behaviors and goals, they can better advocate to us what they need. In the same token, it allows us as coaches to identify their strengths and weaknesses more efficiently, while gaining a better understanding of their learning styles.

  3. Be Purposeful: Every coaching decision you make in practice or in a game should be made with a specific purpose. This sounds like common sense, but I'm not just referring to decisions based on strategy and how to win games. Being purposeful in athlete-centered coaching is understanding the implications that decisions have on athletes and their mental, physical, and social well-being. 

  4. Create a Team Philosophy: A philosophy is more than just a simple mission statement or expectations list for players. A philosophy tells your athletes, parents, and administration why your team has value. You can find an awesome sample list of coaching philosophies here. You can also find a wonderful article with advice on how to create your own unique coaching philosophy here.

  5. Set Goals: Perform this task on your own prior to the season and then sit down with your athletes to have them set their own. Be sure all goals are SMART (specific, measurable, attainable, realistic, and time-bound). Check in during set time frames to see how athletes are achieving goals and coach them through setbacks. 
As we enter the spring coaching season, make small steps to move toward an athlete-centered mindset. You won't change your coaching style immediately, but small changes can have a large impact over time. 

December 27, 2016

New Years Resolutions: How Do We Get Students to Buy In?

Christmas is over and most people are setting their sights on the future and that means New Year's Resolutions! We all know how hard it can be to stick to a resolution as adults so how on earth are we supposed to get our students to buy into goal setting and a fresh start!? Let's start with what we know and then come with a solution to the problem.

Keep in mind I am approaching this from a health and phys. ed perspective, but there ideas and guidelines can apply to many aspect of the educational experience.

 According to Forbes, it's estimated that more than 40 percent of Americans make some sort of New Year's Resolution annually. Of those resolutions, the top ten include three major health goals; losing weight (1), staying fit and healthy (5), and quitting smoking (7). In reality, it's estimated that only eight percent of individuals actually succeed in meeting their resolutions. We as educators may fall into this conundrum ourselves! So how do we set a good example for our students?


Keep It Simple. Too often, our resolutions involve a complete makeover of some aspect of our lives and too much change at one time is difficult to maintain. This is even more important for our students! When we talk to them about New Year's Resolutions and setting appropriate fitness goals, we also have to talk about what makes goals appropriate and attainable. Starting off with a goal of going to the gym for an hour everyday to improve muscular strength and endurance will not be attainable and sets the student up to fail. Instead, break the goal down and determine how often a student can realistically get to gym, how much time they can spend there, and what knowledge they have of weight training to successfully complete a workout. Ensure they take their goals home to discuss with a parent! Parental involvement is key for our students to succeed in any classroom, but especially when we look at impacting their lives outside of the classroom.

The Bottom Line... Keep goals simple to start and add on to them later once the simple goals have been met.

Develop a Plan Generic goals often fail because there is no specific criteria to hold us accountable. "I want to lose weight" or "I want to improve my cardiovascular endurance" are not sufficient resolutions because it provides no details in how to obtain them. It is critical to talk to students about SMART Goals (specific, measureable, attainable, realistic, and time-bound). Developing a plan to match your goal will help you stay motivated and hold you accountable. Help students develop plans in class to help obtain their goals. Provide feedback and suggestions before sending it home to show parents.

The Bottom Line... S.M.A.R.T guidelines for goal setting will help students develop a plan to increase their likelihood of success.

Check In Often. When students know that you have a vested interest in their goals and what they are trying to accomplish, they're more motivated to succeed. Schedule weekly, bi-monthly, or monthly check-ins to see how students are doing. This is an excellent opportunity to provide feedback, support, advice, modify goals, and to celebrate their accomplishments! You can even make up your own classroom achievement award to give to students who meet their resolutions.

The Bottom Line... Be there as a support for your students and celebrate their accomplishments!

Be a Role Model.The best way to motivate students is to show them how you're working on accomplishing your own resolutions. So long as you feel comfortable, share what your resolutions are with your students, check-in with them, and ask them to help reach your goals. I am only in my fourth year of teaching, but I have found that being honest and appropriately open with my students helps them feel safer in my classroom and more willing to share their own experiences. Goal setting and New Year's Resolutions provide the perfect opportunity to collaborate with students to reach common goals.

The Bottom Line... Be the example for your students.

No matter what resolutions you and your students may be embarking on for 2017, remember to follow this simple advice. Resolutions don't have to be overwhelming if they're thought out, organized, and attainable. Remember to go over SMART Goals with your students and check-in often. Many blessings to each of you as we enter 2017!

December 19, 2016

Teachers Pay Teachers Holiday Linky Party!

To quote one of my favorite holiday films, "The best way to spread Christmas cheer is singing loud for all to hear!" Clearly Buddy the Elf wasn't a Teachers Pay Teachers seller because we all know the best way to spread Christmas cheer is by sharing resources for all to hear (er, see).

With that being said, let's get right to the main event. I am launching my first {ever} Linky Party! I have participated in many amazing Linky's in the past and I'm thrilled to be able to host my first one with you all.

For this linky I am asking all participants to post one FREE holiday themed resource and one PAID holiday themed resource. They can be Christmas, Hanukkah, Kwanzaa, or general winter themed. Once you have posted your two links, I humbly ask you to share this post with friends, fellow teachers, and other Teacher Pay Teachers sellers! A special thank you to Ashley Hughes for the border frame and clip art used for the graphic on this post.

If you would like to make this Link Up extra special, I ask you to choose one of the following causes {or a cause of your own} to donate to when you download a free resource. Each of these causes has a special place in my heart!


Let's get this Linky Started!


December 13, 2016

Giving Thanks & Tips to my {100} Followers!

Wow! I am blown away by how dramatically Teachers Pay Teachers has impacted my life in such a short amount of time. I began this journey in January 2016 and have loved every minute of it since!

As a way to say thank you to everyone who has supported me throughout this process, I have a new, free product available in my store! I'll give a little more detail on this later on.

Teachers Pay Teachers has been such a wonderful outlet for me over the past year. I've always thought I wasn't a creative person or that artistic things weren't for me and TpT has showed me how wrong I was! This journey hasn't just been about selling products, although that has certainly been an added benefit. Becoming a TpT seller has made me a better teacher in my classroom! If I'm teaching a lesson I think to myself, if I made this lesson would someone want to buy it? If the answer is yes, woo hoo! If the answer is no, then why am I teaching this way? Is it benefiting my students? Is is keeping them engaged? How can I make this better for them? It truly makes me think about how I am delivering content and to challenge the status quo!

My department has noticed these changes, as has my administration! My co-workers will even come to me with ideas they've done in their own classrooms and say, "You should make this for your store!" I'll go to them and say I've made a new resource and I want to try it out with our classes before posting it for sale and they always say yes. I could not be more blessed to have so much support for what I'm doing.

With all of this being said, I wanted to share some tips and tricks I've learned from so many amazing sellers along the way for any educators who are interested in becoming a TpT seller or who are just getting started.


  1. Become a Premium Seller - Immediately: I read this everywhere and thankfully listened! I purchased my membership on January 16, 2016 and it was scary. I hadn't sold a single product, but everyone was advising that it would pay for itself in the first month. They were right! In my first real month of sales (February 2016) I sold $122 worth of products and took home $103.39 in earned income. If I had still been a basic seller, I would have earned $61. Going premium is worth every penny!

  2. Get on the Forums: The TpT Forums are without a doubt the best thing that ever happened to me as a new seller! There is so much information here to read up on. You can ask your own questions, introduce yourself, connect with other sellers, and so much more! Be sure to read through before asking a question though, there is a very good chance the information is already there!

  3. Invest in Versatile Clip Art: Another tip I received was to pay for quality clip art. There is a lot of clip art that you can get for free, but having the improved quality for a small selection when you first get started is incredibly helpful! I invested in sports themed clip art and have used it in so many of my resources since then. Find what clip art you think you'll use the most and make the purchase. I have many sellers who I revisit because I love their work so much!


  4. Invest in Font Options: There are a tone of sellers who makes fonts, but let me save you some time and money. Kimberly Geswein is the only font store you will ever need. She was everything. When you see a font other sellers are using an you think to yourself, where did they get that!? I will bet you 9.9 out of 10 times, it's from Kimberly Geswein. You can download all of her fonts for free for personal use only. She then offers font licenses to purchase for $5 which allows you to use her font in your TpT products. Now, this is the good part. She offers a lifetime all fonts license for $299. Don't have $299 sitting around? If you purchase 60 single font license for $5, contact her so she can verify your purchases, and she will give you her all fonts license. Basically, she's offering you a payment plan!  She offers a free font pairing guide to help show you how to pair fonts for a good visual aesthetic. She is awesome!

    Note: I'm working on my payment plan as we speak {slowly, but surely}... I can't wait to have unlimited use of her fonts! In order to use this method effectively (or if you've already purchased single font licenses) you'll need to purchase additional single font licenses. Do not purchase the $299 all font license at one time if you've already purchased a single font license, because you'll essentially be losing what you've already paid for. For example, I personally have purchased six single use font licenses. I would want to pay for 54 more individual licenses and contact Kimberly instead of buying the $299 license because I would be losing $30 I've already paid.

  5. Hold Off on Social Media: Everyone I spoke to advised me to hold off on social media and I didn't listen. I tried to pin, tweet and blog immediately after becoming a seller and it was a mistake. I was overwhelmed trying to keep up with everything and I believe that my sales and product line suffered because of it. I am a just shy of a year in now and I've just started utilizing social media to the fullest! My blog is updated weekly, I tweet and post to Instagram what my classes are doing daily, and I can Pinterest like a pro! I would recommend having 10-15 solid resources in your store before you start utilizing Pinterest, 30-40 solid products before using twitter, and waiting until you feel comfortable utilizing your products in your classroom before moving on to Instagram and Facebook.

  6. Understand Copyright Laws: I did a lot of research on copyright and trademark laws before creating my products. There is a ton of information out there and it is important to the integrity of your work, as well as the integrity of Teachers Pay Teachers. It's also very frustrating for those of us who know what the laws say to scroll through TpT and see blatant violations everywhere. If there is something popular with kids that is produced or manufactured by a major company, it's likely copyrighted or trademarked. Just because you see someone else selling it on TpT, doesn't mean it's okay or legal. Teachers Pay Teachers offers help directly from their site here.

  7. Make Good Covers & Brand Yourself: This is important on TpT for many resources! When potential buyers are scrolling through a long search for a product you want to be able to catch their eye! Colorful, easy to read covers are an excellent way to entice buyers to view your product. Be consistent with your covers so buyers know, "Oh, that's a {insert seller} product!"

  8. Find Your Niche: Find what you are passionate about when thinking of products for your store! If you try to make products about things you're not knowledgeable or experienced in, it will show in the product. Don't try to fit into the crowd, make resources you can make well regardless of what category that places you in!

  9. Purchase a Seller's Kit or Binder: Let's be honest here, if you're new to TpT or thinking about becoming a seller, you likely have no clue what you're doing. I certainly didn't! There is nothing wrong with being new and purchasing a sellers kit or binder is so helpful! I purchased mine here and it has kept me so organized! I can track my sales by month, quarter, and year round. I can track what I've purchased, what I want to blog, I can plan out resources and units, and so much more.

  10. Understand TpT Etiquette & Common Decency: You're going to log in and see so many great ideas! Maybe you've been a buyer and you've decided to create your own store or maybe you're scrolling through the search for inspiration. Whatever you're doing it's important to ensure you're not just re-making other sellers resources and selling them as your own! All of your products should be your own unique creation that add to what the rest of the community has already created, not a copycat that hurts other sellers.

  11. Read the Terms of Service Agreements: Every seller should have a terms of service (TOS) agreement within their downloads. Read them. Clip art especially has specific conditions for using that source in other products you create. Read them carefully and follow their instructions so you are not violating their TOS.

  12. Make a Terms of Service Agreement: Protect your work and include a TOS agreement with every product download. This allows you to back up a claim made against another seller if you ever need to. Not only that, it helps buyers understand what your rules are so they can use your resources appropriately. 

There are many more tips I can provide, but I believe this is a good base for anyone just getting started. I have learned so much along this journey and if you're considering selling on TpT I highly recommend it! If you ever want to ask me specific questions, please feel free to e-mail me at sassypeteach@gmail.com.

As a thank you to my followers, check out my latest freebie here. I hope you enjoy utilizing these frames in your future TpT creations!

December 6, 2016

VAHPERD Review Series Part 4: The Brain Game Challange

I am so excited to share my final session review from the 2016 VAHPERD Conference! This presentation was created by Andrea Samsky and I have to say that there is not a more creative person teaching HPE in this universe! For example, when she teaches soccer in class, every piece of equipment takes on a role in the circulatory system (i.e. the balls are oxygen) and she utilizes these pieces to teach two or more concepts at once. My mind was truly blown! I could have stayed and talked to her for HOURS to listen to all of the ways she incorporates health concepts into the PE realm for her elementary students. If you are ever in search of creative ideas for your HPE classroom, reach out to Andrea, she is phenomenal!

Well now that you've heard about how wonderful Andrea is, let me give you all the skinny on what she taught us at VAHPERD to prove it! This lesson was created for elementary students, but after going through it with her, these can easily be adapted to fit the middle school classroom. This activity is called the Brain Game Challenge and works with a station system and worksheet to get kids building, moving, and learning throughout the classroom. I did mark this as a freebie, but there are components you will need before taking this into class and I'll warn you, it requires some work, but the payoff is worth it!

Equipment:


  1. Pool noodles cut into 1/2 inch sections (approximately 23 per group)
  2. Rope (approximately 24-36 inches long) per group
  3. Printed worksheets (one per group)
  4. Pens/Pencils (one per group)
  5. Station Cards
  6. Cones (one per station)
  7. Hula Hoops (one per group)


Setup:
  1. Stations should be spread apart around the outside of your safe space with all necessary equipment.
  2. Each group should find a hula hoop with their equipment placed inside of it.
Recommendations:
  1. If possible, try to keep group sizes between 3-5 so students are actively involved.
  2. Number your station cards so they match the question on the worksheet. You don't want students spending five minutes at a station sitting and staring at the worksheet trying to figure out where the answer is - keep it simple for them.
  3. Avoid making every individual child fill out their own sheet - it keeps them still for longer bouts of time.
  4. Move around throughout the activity and check on student learning and retention.
  5. Review at the end of class while keeping kids active.

     If you would like to see the PDF files of her station cards or worksheet, please shoot me an e-mail at sassypeteach@gmail.com. If you know of an easy way to upload those files directly to blogger  as a PDF, please let me know! I'm still learning and can admit, I'm not sure of the best way to get you that information. You can see in the sample below that the set she gave us is for lower elementary! Over Christmas break, I will be working on a middle school version for those of us who may be interested!


     Don't forget to submit your ideas for my TpT store by December 20! E-mail sassypeteach@gmail.com with your submissions and check out the entries and rewards post here! Until next time :)

November 30, 2016

All I Want For Christmas Is...

I'm making a list and checking it twice, I promise to make what ever you like, any resource you can think of!

Welcome back everyone! This week I really want to do something special for you guys as my followers. Drum roll please...

I want to find out what resources you want to see me create! As we enter the holiday season, I will have much more free time on my hands to get crafting on TpT and what better way to utilize that time than by helping you all! Not to mention, if you offer a suggestion for a resource you would love to see, there will be an added benefit for you. As a TpT seller, I'm constantly trying to think of new and exciting products for my followers and I really want to hear from you! What products do you want to see created? What will you utilize most in your classroom? What are you dying to have, but don't have time to create on your own? I want to know it all! So without further ado, let's get into how this will work and what you can expect from me!


  1. E-mail your new resource idea that you would love to see me create to sassypeteach@gmail.com. I humbly ask to keep these ideas health and PE related as that is my specialty.
  2. Be creative! It can be a holiday specific item, a general classroom item, health, PE, the sky is the limit.
  3. Be as specific or broad as you'd like with your request. Please keep in mind that if you have a specific vision for a project I want to know so I can give you exactly what you're looking for.
  4. Be sure to leave your TpT store name or the name you would like to see credited in the creation of the project.

  1. I will create your resource and place it in my store for purchase, BUT...
  2. I will send you a copy of the resource FOR FREE as a way to say thank you for the idea!
  3. Credit given to you in the product download!

  1. Please submit your project idea by December 20, 2016. This will allow me the time I need to create your idea.


My goal is to fill my store with products that will benefit the entire HPE community! We teach such a valuable subject to our students and my goal is to help all educators achieve greatness in the classroom.

So from the Sassy PE Teacher to you this holiday season, Merry Christmas, Happy Chanukah, and Happy Kwanzaa. I hope each of you are blessed throughout this holiday season and beyond.

Note: Special thanks to Ashley Hughes for the header borders, as well as the primary picture background and clip art.

November 29, 2016

VAHPERD Ideas Worth Sharing Part 3: Music Like You've Never Heard Before

Welcome back for part three of my VAHPERD review series! I am so excited to share this session with you all as it blew my mind when I sat through it. This edition is all about music in PE, how to edit it with iTunes, and the legality of it all. This amazing session was titled Music, Let's Get Your Gym Rocking and was presented by Patrick Lynch of Hampton County Public Schools. He was generous enough to include tutorial videos for those of us that attended! That means you'll get to read and see how to remix all of your songs for future classes.

The most useful thing we learned about during this session was how to edit track lengths in iTunes. I can't tell you how many times I have wanted to use a song that I know the kids will love, only to find it uses bad language and an edited version isn't available. If only I could shorten it to the first thirty seconds or use a small segment somewhere within the track... WELL NOW I KNOW HOW thanks to Patrick.

Converting Songs from YouTube to an MP3 File (legally):

  1. Go to www.YouTube.com and search for a song you would like to convert.
  2. Once you have found the song you are looking for, copy the URL link from the top of the browser.
  3. Visit http://convert2mp3.net/en/ and input the URL you copied from the YouTube video into the "Insert video link (URL) and select format" box.
  4. The video will convert and give you the option to provide the artist name and song title. This will be automatically filled in, but you have the opportunity to edit the names if you'd like to.
  5. Click continue and you will see a "download"button. Click download and the file will save to your computer.
  6. Open iTunes and select File and select upload file.
Confused? Don't be because you will find Patrick's step-by-step guide on how to do everything I've just mentioned. Start this video from the beginning and pause around the 4:00 minute mark to read the next section.


Editing Songs in iTunes:
  1. Select the song you would like to edit.
  2. Right click, select get info and then select options
  3. Once here select Adjust equalizers and then select start & stop time {this allows you to fully edit the track}
  4. Select the portion of the song you'd like to use {Example: Start at 1:30 | End at 1:55}
  5. Select Input into playlist when you're ready to use

Your track is now ready to play for the times you selected! Like all good things however, there is a con to this method. The song is shortened no matter what until you either make a copy of the track or go through the steps above and reset the settings you've used. Luckily, Patrick taught us how to make this transition simple:
  1. You can change the track back to its original formatting after use
    OR

    Skipping the original steps above...
  2. Select the song you would like to edit.
  3. Right click, select options, and then select AAC version.

    OR

    Using the steps above and working with the already edited version...
  4. Select the edited track, select file, and select create AAC version
  5. Rename files to say something different (i.e. Uptown Funk - Workout)
This second process allows you to keep your original file untouched, while creating a new file to use in playlists for your classroom. Confused? Not to worry, below you will find Patrick's step-by-step guide on how to do everything I've just mentioned. Skip to the 4:00 minute mark in the video to specifically see how to cut songs in iTunes.


Why does any of this matter?

Music is an essential component to each of our HPE classrooms. We have the power to change the environment we create with every song and activity. Music helps students connect to our content and express themselves while participating in activity.

Below are some ideas on how to utilize music in your classroom using these tools:

  1. Workouts: Make an uptempo song clip that last 20 seconds for the students to be working throughout, followed by a 10 second slower tempo for a break or transition phase.
  2. Stations: You could also use 1 minute long clips to signal for station rotations - when the song changes, students know to switch
  3. Full Song Workouts: Certain songs that use the same word repeatedly are awesome for warm-ups and small workouts throughout class. For example, AC/DC's Thunderstruck says the word Thunder 33 times. When they hear the word, they perform an exercise you've specified (like a burpee), while the rest of the song is playing they perform a lower intensity movement (like a high knees march).
FitnessGram Will Never Be the Same:

Finally, how many of you have the Pacer test track memorized? Let's just be honest and admit that we all do. We hate the musical background it has and the kids do too... So let me (er, Patrick) rock your world with the following information:

YOU CAN PUT YOUR OWN MUSIC OVER THE PACER TRACK.

What!? Yes, you read that correctly. Check out the video below as Patrick shows you how to utilize Garage Band to rearrange the tragic background music of the pacer.


I hope each of you found the information from this session as amazing and life changing as I did! It has taken me a few tries to get the directions right so if you try it out and struggle with it, just know to keep trying! The more you do it, the more natural the process will become, and the more your students will enjoy music in your classroom!

Check back next week for the final part of my VAHPERD review series to learn all about an incredible central nervous system integrated activity {drum roll please...} that can be used for middle AND elementary students (with minor adaptations)!

November 22, 2016

VAHPERD Ideas Worth Sharing Part 2: Chicken Football


Last week I shared part one of my VAHPERD Review Series and this week I'm back to share another favorite! I can't wait to use in my classroom, especially as I move in to football lead up games after Thanksgiving Break. Like Crazy Kickball, this game was taught during the "Best We've Ever Seen" presentation. Unfortunately the original source of the game was not cited when presented, but we share free tools and ideas in the PE community all the time, so thank you to the creator of this awesome lead-up game. The name sounds a little strange, but this game is great for teaching so many football concepts!


This game is a great lead-up game for football because it works on moving up and down the field, while downs and yardage can easily be incorporated to advance the concept for middle school students. 

Equipment: 4-6 chickens or other item (footballs were not recommended because students tend to throw them and you may need more than 4-6 depending on your class size)

Recommendations: No more than 3-4 team members per group to avoid to much wait time.

Directions: Start with two groups facing each other on opposite sides of the "field" and the chicken in the middle. When groups start, the first member in line for each team will run to the center and rock, paper, scissors. The winner of one round will pick up the chicken and try to run into the opposing teams end zone. The non-winner must return to the end of their line. The next person in line of the non-winning team can run out to meet the winner with the chicken as soon as their teammate is defeated. Once they meet, the member with the chicken drops it where they are and they must rock, paper, scissors again. The winner picks up the chicken and runs to their opponents end zone. This process continues until someone scores. After a score, the chicken is placed back in the middle of the playing area.

Adaptations: This game is great on its own, but if you want to adapt it to have more substance it is absolutely possible. Talking to students about downs and distance, turnovers, and scoring drives can all be incorporated with ease as students move through this game. You can also use other equipment instead of the chicken.

I hope that this game is a hit for you in your classroom! Stay tuned next week to learn all about music in the classroom, as well as a tutorial on how to set the pacer to YOUR OWN MUSIC! My mind was completely blown by this concept and I know yours will be too.


November 15, 2016

VAHPERD Ideas Worth Sharing Part 1: Crazy Kickball

The Sassy PE Teacher is finally back in action! I truly tried to keep up with my store and blog during cross country season, but it simply was not possible.

I apologize for the hiatus, but I am excited to refocus my efforts and share some truly incredible ideas thanks to fellow professionals in my beautiful home state of Virginia!

The Virginia Association for Health, Physical Education, Recreation, and Dance held it's annual conference in my hometown of Midlothian, VA from November 11 - 13 and it was an action packed weekend! I've been to many VAHPERD conferences, as well as SHAPE Southern District, and the SHAPE National Conference, but this conference was truly spectacular. I left with so many new ideas, knowledge, and research. My plan is to share many of them with you all over the next few weeks.

First up in my VAHPERD series is a game that I can't wait to implement in my own classroom! It is a new twists on an old classic and was featured during a session titled, "The Best We've Ever Seen."


Also known as "Fitness Kickball"

This game is similar to traditional kickball in the sense that there are two teams, one of which is kicking while the other is defending the outfield. This is also where the similarities end so be prepared to move and lose track of the score,

Equipment: You need three balls, five cones, and a bucket or tub large enough to fit three playground balls in. The setup is identical to traditional kick ball, except for the tub directly next to the pitcher.

Recommendations: Always have the teacher pitch. Anyone who has played kickball before knows this is the cardinal rule!

Directions: Start the game with the three playground balls inside the tub. One at a time and at 3-4 second intervals, pitch the balls to the kicking team. {You can vary the rules on how students have to kick for your classroom, but a general rule of thumb is to ensure the ball moves forward (bunts count).} Once the ball has been kicked, students are trying to run the bases one time as quickly as possible. When they return to home base, they move to the end of the line. Don't worry about this line part, it moves very quickly... The fielding team is trying to collect all three balls into the tub at the same time. Once they do this successfully, the teams will switch roles and continue play.

Like all games there are certainly pros and cons to this one. What I love about this game is that it gets kids moving! Unlike traditional kickball when only one student is running at a time, this version allows kids to constantly move on both sides of the ball. Student interest and involvement is off the charts with this as well! Cons of this game revolve around the lack of standards content. You can definitely argue that fitness concepts can be incorporated, but without adaptations this game will not be content focused and therefore shouldn't be played on a regular basis.

Adaptations: Now, the good news about the cons is that we can make some small changes to incorporate standards. Incorporating health standards into PE content is an excellent way to make fun games more educationally focused. Tell students that the playground balls are oxygen, the kickers are arteries who have to send the oxygen through the body, while outfielders are veins who need to take the carbon dioxide back to the lungs {the tub} to be dumped so blood can be oxygenated. All of a sudden, your students are learning about the circulatory system while improving cardiovascular endurance in a fun, engaging way.

I hope that this game is a hit for you in your classroom! Stay tuned next week to learn all about Chicken Football, an exciting warm-up game that teaches basic football movement, cooperation, and critical thinking.