I'm not sure about y'all, but this school year is flying by! I cannot believe we are less than a month away from celebrating Valentine's Day! After a successful Christmas product link up, I want to continue the trend this week by hosting my second link up with a Valentine's Day product theme!
All you have to do is find your favorite Valentine's Day products, copy the link to your store, and share below! Share as many links as you'd like, but I humbly ask that you share at least one freebie so we can promote our stores while saving other teachers some green.
Please feel free to share my blog link with other TpT sellers or teachers who are looking for awesome Valentine's Day classroom resources!
I hope each of you find resources you can utilize in your classrooms! You can follow me on twitter and instagram @sassypeteach for my latest product updates! You can also check out my store in the top banner for some awesome Valentine's Day resources (with more coming soon)!
Have an amazing week teacher friends!
Showing posts with label teachers pay teachers. Show all posts
January 17, 2017
Valentine's Link Up: All Subjects Welcome!
January 10, 2017
How to Teach a Middle School Bowling Unit
Bowling is an excellent indoor recreation sport that allows students to learn more about skill-related fitness components, as well as etiquette, sportsmanship, and cooperative skills! There is no better time to teach bowling than right now in the cold of winter. Your classes are already indoors and in most cases, you're forced to combine with other classes due to limited space. Bowling is a wonderful sport that can accommodate each of these circumstances while still getting students moving and grooving! So if you're looking for advice on how to start your own bowling unit or if you're looking for new ideas to spice up your existing unit, then keep reading! If you're looking for an awesome freebie, you'll find access to my manual scoring assessment at the end of this post!
Before Getting Started:
It's important to analyze your equipment and potential equipment needs before beginning any unit in your classroom. It's also essential to be creative, especially if you don't have "real" bowling equipment. My school is very fortunate to have access to authentic bowling pins for 10 lanes, 10 rubber or plastic bowling balls {I do not recommend purchasing plastic bowling balls - more on that later}, and mats that act as bumpers at the far end of each lane. Your school may not have this equipment (and I've been there before) so you may need to be more creative.
If you have bowling equipment already, fantastic! If you don't currently have bowling equipment, but you have the resources to purchase equipment, here are my top recommendations for bowling equipment:
Pins:
Prior to class, I would have reviewed peer feedback. After my students have completed the instant activity and fitness activity for the day, I quickly review and demonstrate the basic skill learned in day one and hand back their peer feedback from the previous class. On day two, I add station task cards to each lane. Students work through various setups throughout class and track their progress. For example, a station task card looks like:
Day five is assessment day and I have been notifying my students about this every day leading up to it. My assessment style is informative and, in my opinion, always students to test in a comfortable environment without fear of making mistakes.
Before Getting Started:
It's important to analyze your equipment and potential equipment needs before beginning any unit in your classroom. It's also essential to be creative, especially if you don't have "real" bowling equipment. My school is very fortunate to have access to authentic bowling pins for 10 lanes, 10 rubber or plastic bowling balls {I do not recommend purchasing plastic bowling balls - more on that later}, and mats that act as bumpers at the far end of each lane. Your school may not have this equipment (and I've been there before) so you may need to be more creative.
If you have bowling equipment already, fantastic! If you don't currently have bowling equipment, but you have the resources to purchase equipment, here are my top recommendations for bowling equipment:
Pins:
- Hollow Bowling Pins from Flag House | $44.50 per 10 piece set.
- Weighted Bowling Pins from Flag House | $52.00 per 10 piece set.
Balls:
- Polyvinyl 5lb from Flag House | $44.50 per ball
- Polyvinyl 2.5lb from Flag House | $27.75
- Weighted 2.5lb Foam from Flag House | $16.50
- Rainbow Striker Rubber Bowling Ball by Gopher | $34.95 - $54.95 (individual) or $199 (set of six)
Complete Sets:
- 10 Pin 5lb Ball Set from Flag House | $89.00
- UltraPin Bowling Sets from Gopher | $69.95 - $135.00
You can certainly find cheaper options, but what I love about Gopher is their lifetime replacement guarantee. When an item breaks or wears down, they will replace it, no questions asked. My department chair and I do this frequently. Flag House also has the widest variety of options.
I'm sure some of you are looking at these prices and thinking, "Wow, these all look great, but I simply don't have the budget to purchase these items!" You're in luck because there are a ton of items you probably already have in your storage closet that can be just as effective!
![]() |
| Courtesy of Pinterest https://www.pinterest.com/pin/285204588875182233/ |
Creative Pin Suggestions:
- Empty 2-Liter Bottles
- Paper Towel Rolls (glue three together to help them stand better)
- PVC Pipe (cut in 10-15 inch lengths)
- Wide Pool Noodles (cut in 10-15 inch lengths)
Creative Ball Suggestions:
- Traditional Foam Balls (best suggestion)
- Soccer Balls (size four works best)
- Basketball (not ideal as they can be too big for students hands)
Setting Up Your Bowling Unit:
This will vary based on your school, your PE/Health rotations and other factors, but my department works in a two week block schedule format. This allows me to teach five 90-minute lessons during each PE rotation. I breakdown my skill development into each of the five days:
- Day 1: Introduction to Basic Skills & Vocabulary, Peer Evaluation
- Day 2: Review Basic Skills, Station Skills, Self-Assessment
- Day 3: Station Skills, Introduce Manual Scoring, Peer Assessment
- Day 4: Traditional Bowling, Manual Scoring Skills, Self-Assessment
- Day 5: Summative Skill Assessment, Summative Manual Scoring Assessment
In my 90-minute class periods, I eliminate 14-20 total minutes (before and after class) for changing and instant activity (before class only). I also include a 10-20 minute fitness activity before getting into the main topic, in this case bowling, which gives me about 50 minutes to teach content. You can easily manipulate these times to work with your own schedule. At my former school, I had 50 minute class periods. I eliminated 12 minutes for students to change (includes before class - 6 min - and after class - 6 min) and that left approximately 38 minutes for content. If your schedule is closer to this time frame, I eliminate a fitness activity when bowling because it requires so much setup throughout the activity.
Day One | Introduction to Basic Skills
I focus on ball grip and a three step approach during day one. Educators differ on the type of approach taught, but as long as students are releasing the ball with the opposite (or non-dominant) foot in front, the number of steps in the approach can vary. After brief instruction and demonstration, I break students into groups of four.
To the left is the setup I use in my own classroom. We have 10 lanes set up in our gym with four students at each lane. Two students begin at the top of the lane as the bowlers, while the other two begin at the bottom of the lane . (1) Bowler one rolls their first bowl, with bower two providing verbal feedback on hand grip and three step approach. (2) The two team members on the bottom of the lane, move pins that have been knocked over to the side. (3) Bowler one then bowls their second ball, with bowler two again providing verbal feedback. (4) The two team members reset the pins so all ten are standing. (5) Bowler two now takes their turn, with all other steps repeating. (6) Once bowler two has finished, they move to the bottom of the lane for pin setup, while the previous team members move to the top of the lane to bowl their turns.
As the instructor, I am moving around with each group to fix form, provide formative feedback, and check for understanding. If I see a pattern of errors or misunderstanding, I will stop the group, briefly explain the issue, get them working again, and then go back to working with students one on one.
I also have a peer evaluation form. Each student fills out a form about the partner they observed bowling with helpful, respectful, and constructive feedback.
Day Two | Review Basic Skills, Station Skills, Self-Assessment
Prior to class, I would have reviewed peer feedback. After my students have completed the instant activity and fitness activity for the day, I quickly review and demonstrate the basic skill learned in day one and hand back their peer feedback from the previous class. On day two, I add station task cards to each lane. Students work through various setups throughout class and track their progress. For example, a station task card looks like:
Each student is given a worksheet to track which stations they have visited and how they did. Students think it's fun to work on different shots. This worksheet becomes their self-assessment later on when they review it before turn in. I grade the sheet for completion, provide feedback, and give it back during the next class period.
Day 3 | Station Skills, Introduce Manual Scoring, Peer Assessment
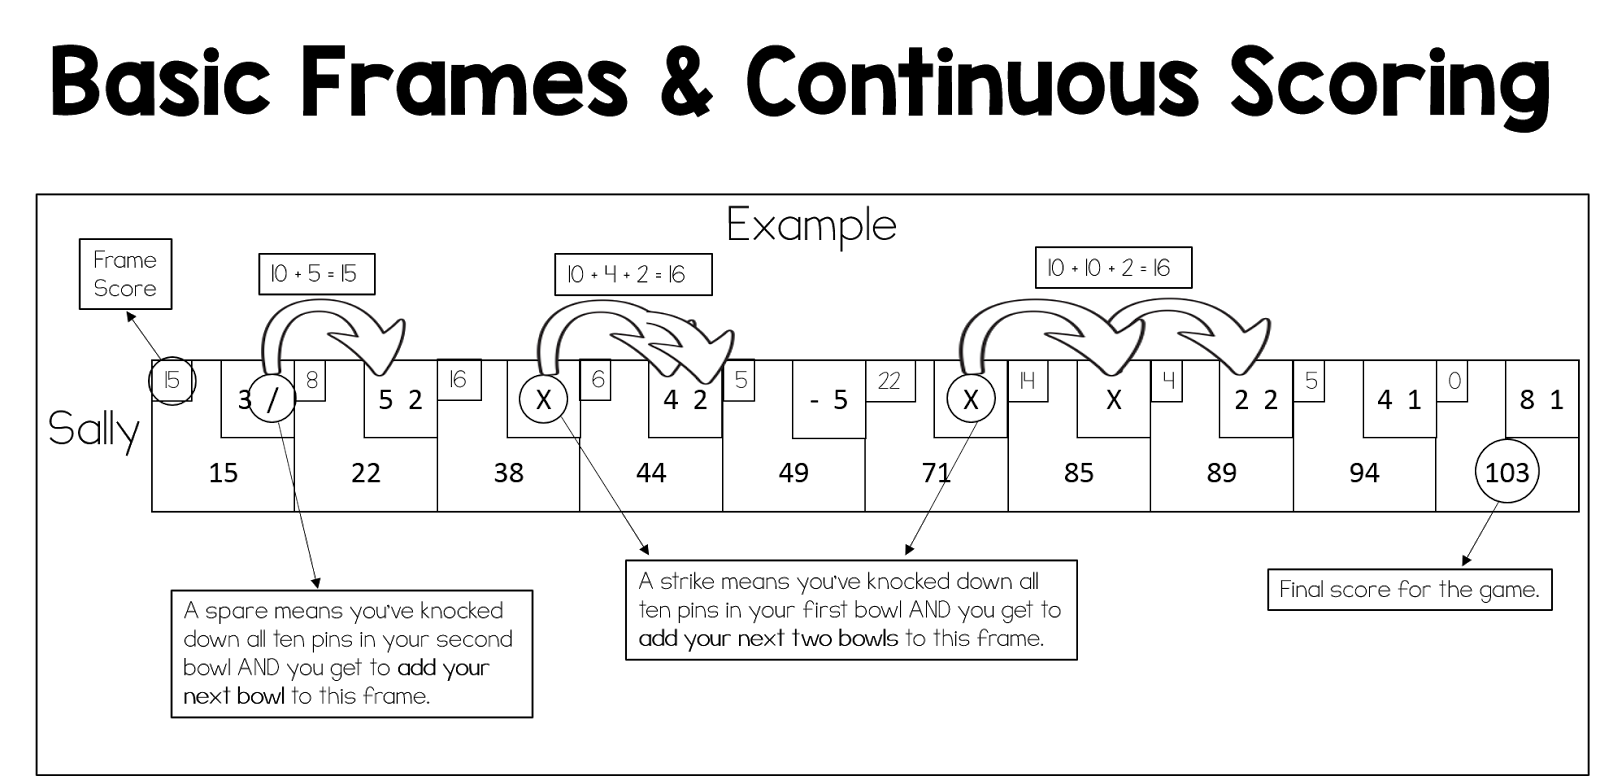
Students continue to work on stations, often returning to station they've struggled with. There is a station for every group and the general rule is that if a station is occupied, they must select another station. This is also the day I introduce manual scoring. Students often have no idea how scoring in this sport works because they've never had to track it themselves. I start by teaching basic frames and continuous scoring.
Introducing spares and strikes is often a skill I wait to introduce until seventh or eighth grade, but only you know your classes! If you think they can take those skills on sooner, I have this visual to assist students with understanding them.
Day 4 | Traditional Bowling, Manual Scoring Skills, Self-Assessment
On day four of my bowling unit, I take away the stations and let students practice their new skills in a traditional bowling environment. Students also keep track of their own scores and apply their scoring knowledge in a formative setting.
My role on day three is to facilitate feedback, assist with scoring, provide opportunities to challenge students, and collect/review bowling score cards. I print my scorecards from Print Your Brackets. They are easy to print and perfect for classroom use!
Day 5 | Summative Skill Assessment, Summative Manual Scoring Assessment
Day five is assessment day and I have been notifying my students about this every day leading up to it. My assessment style is informative and, in my opinion, always students to test in a comfortable environment without fear of making mistakes.
Skill Assessment: I allow students to pick their own groups and lane. I move to the students lane, inform them that I will be assessing their next bowl, notify them what I am looking for, and allow them two opportunities to find success. I place my criteria on an Excel Spread sheet with each students name pre-entered and fill in their results as I record them. I assess with a simple yes or no system. The individual skill is either present or not. If the skill is present, it is marked with a Y and if it is not present or incomplete, it is marked with a N.
Scoring Assessment: Students complete a pre-filled scoring sheet for four bowlers. I give my students the option on which scores they would like to tally. For example, in my assessment, I ask students to complete two of the four scores. They must score Corey or Emily as one of the two options and Michael or Patricia as the second option.
I also tell my students that if they want to work through all four, I will count their best two. I award one point per frame. I also grade based off the individual frames.
For example, if a student is working on Corey and scores 9 on frame one (correct), 19 on frame two (incorrect), and 27 on the third frame (half correct), they would earn two total points. They answered frame one correctly (+1), but answered frame two incorrectly (+0). They technically answered frame three correctly as the frame score is 8, but now they've based it off their incorrect score in frame two. They receive a point because they scored that frame correctly. You can access a copy of my scoring assessment and answer key for free in my store! While you're there you can also see my Bowling Classroom Newsletter to help keep parents updated on the latest class events!
And there you have it! This is how I like to run my own middle school bowling unit. Tell me what you think or show me how you run your own bowling unit! I love to see how other physical educators are teaching in their classrooms. If you have any questions, please don't hesitate to shoot me an e-mail at sassypeteach@gmail.com! Also be sure to follow me on twitter and instagram @sassypeteach as I'll be teaching my bowling unit over the next two weeks!
December 19, 2016
Teachers Pay Teachers Holiday Linky Party!
To quote one of my favorite holiday films, "The best way to spread Christmas cheer is singing loud for all to hear!" Clearly Buddy the Elf wasn't a Teachers Pay Teachers seller because we all know the best way to spread Christmas cheer is by sharing resources for all to hear (er, see).
With that being said, let's get right to the main event. I am launching my first {ever} Linky Party! I have participated in many amazing Linky's in the past and I'm thrilled to be able to host my first one with you all.
For this linky I am asking all participants to post one FREE holiday themed resource and one PAID holiday themed resource. They can be Christmas, Hanukkah, Kwanzaa, or general winter themed. Once you have posted your two links, I humbly ask you to share this post with friends, fellow teachers, and other Teacher Pay Teachers sellers! A special thank you to Ashley Hughes for the border frame and clip art used for the graphic on this post.
If you would like to make this Link Up extra special, I ask you to choose one of the following causes {or a cause of your own} to donate to when you download a free resource. Each of these causes has a special place in my heart!
Let's get this Linky Started!
December 13, 2016
Giving Thanks & Tips to my {100} Followers!
As a way to say thank you to everyone who has supported me throughout this process, I have a new, free product available in my store! I'll give a little more detail on this later on.
Teachers Pay Teachers has been such a wonderful outlet for me over the past year. I've always thought I wasn't a creative person or that artistic things weren't for me and TpT has showed me how wrong I was! This journey hasn't just been about selling products, although that has certainly been an added benefit. Becoming a TpT seller has made me a better teacher in my classroom! If I'm teaching a lesson I think to myself, if I made this lesson would someone want to buy it? If the answer is yes, woo hoo! If the answer is no, then why am I teaching this way? Is it benefiting my students? Is is keeping them engaged? How can I make this better for them? It truly makes me think about how I am delivering content and to challenge the status quo!
My department has noticed these changes, as has my administration! My co-workers will even come to me with ideas they've done in their own classrooms and say, "You should make this for your store!" I'll go to them and say I've made a new resource and I want to try it out with our classes before posting it for sale and they always say yes. I could not be more blessed to have so much support for what I'm doing.
With all of this being said, I wanted to share some tips and tricks I've learned from so many amazing sellers along the way for any educators who are interested in becoming a TpT seller or who are just getting started.
- Become a Premium Seller - Immediately: I read this everywhere and thankfully listened! I purchased my membership on January 16, 2016 and it was scary. I hadn't sold a single product, but everyone was advising that it would pay for itself in the first month. They were right! In my first real month of sales (February 2016) I sold $122 worth of products and took home $103.39 in earned income. If I had still been a basic seller, I would have earned $61. Going premium is worth every penny!
- Get on the Forums: The TpT Forums are without a doubt the best thing that ever happened to me as a new seller! There is so much information here to read up on. You can ask your own questions, introduce yourself, connect with other sellers, and so much more! Be sure to read through before asking a question though, there is a very good chance the information is already there!
- Invest in Versatile Clip Art: Another tip I received was to pay for quality clip art. There is a lot of clip art that you can get for free, but having the improved quality for a small selection when you first get started is incredibly helpful! I invested in sports themed clip art and have used it in so many of my resources since then. Find what clip art you think you'll use the most and make the purchase. I have many sellers who I revisit because I love their work so much!
- Invest in Font Options: There are a tone of sellers who makes fonts, but let me save you some time and money. Kimberly Geswein is the only font store you will ever need. She was everything. When you see a font other sellers are using an you think to yourself, where did they get that!? I will bet you 9.9 out of 10 times, it's from Kimberly Geswein. You can download all of her fonts for free for personal use only. She then offers font licenses to purchase for $5 which allows you to use her font in your TpT products. Now, this is the good part. She offers a lifetime all fonts license for $299. Don't have $299 sitting around? If you purchase 60 single font license for $5, contact her so she can verify your purchases, and she will give you her all fonts license. Basically, she's offering you a payment plan! She offers a free font pairing guide to help show you how to pair fonts for a good visual aesthetic. She is awesome!
Note: I'm working on my payment plan as we speak {slowly, but surely}... I can't wait to have unlimited use of her fonts! In order to use this method effectively (or if you've already purchased single font licenses) you'll need to purchase additional single font licenses. Do not purchase the $299 all font license at one time if you've already purchased a single font license, because you'll essentially be losing what you've already paid for. For example, I personally have purchased six single use font licenses. I would want to pay for 54 more individual licenses and contact Kimberly instead of buying the $299 license because I would be losing $30 I've already paid. - Hold Off on Social Media: Everyone I spoke to advised me to hold off on social media and I didn't listen. I tried to pin, tweet and blog immediately after becoming a seller and it was a mistake. I was overwhelmed trying to keep up with everything and I believe that my sales and product line suffered because of it. I am a just shy of a year in now and I've just started utilizing social media to the fullest! My blog is updated weekly, I tweet and post to Instagram what my classes are doing daily, and I can Pinterest like a pro! I would recommend having 10-15 solid resources in your store before you start utilizing Pinterest, 30-40 solid products before using twitter, and waiting until you feel comfortable utilizing your products in your classroom before moving on to Instagram and Facebook.
- Understand Copyright Laws: I did a lot of research on copyright and trademark laws before creating my products. There is a ton of information out there and it is important to the integrity of your work, as well as the integrity of Teachers Pay Teachers. It's also very frustrating for those of us who know what the laws say to scroll through TpT and see blatant violations everywhere. If there is something popular with kids that is produced or manufactured by a major company, it's likely copyrighted or trademarked. Just because you see someone else selling it on TpT, doesn't mean it's okay or legal. Teachers Pay Teachers offers help directly from their site here.
- Make Good Covers & Brand Yourself: This is important on TpT for many resources! When potential buyers are scrolling through a long search for a product you want to be able to catch their eye! Colorful, easy to read covers are an excellent way to entice buyers to view your product. Be consistent with your covers so buyers know, "Oh, that's a {insert seller} product!"
- Find Your Niche: Find what you are passionate about when thinking of products for your store! If you try to make products about things you're not knowledgeable or experienced in, it will show in the product. Don't try to fit into the crowd, make resources you can make well regardless of what category that places you in!
- Purchase a Seller's Kit or Binder: Let's be honest here, if you're new to TpT or thinking about becoming a seller, you likely have no clue what you're doing. I certainly didn't! There is nothing wrong with being new and purchasing a sellers kit or binder is so helpful! I purchased mine here and it has kept me so organized! I can track my sales by month, quarter, and year round. I can track what I've purchased, what I want to blog, I can plan out resources and units, and so much more.
- Understand TpT Etiquette & Common Decency: You're going to log in and see so many great ideas! Maybe you've been a buyer and you've decided to create your own store or maybe you're scrolling through the search for inspiration. Whatever you're doing it's important to ensure you're not just re-making other sellers resources and selling them as your own! All of your products should be your own unique creation that add to what the rest of the community has already created, not a copycat that hurts other sellers.
- Read the Terms of Service Agreements: Every seller should have a terms of service (TOS) agreement within their downloads. Read them. Clip art especially has specific conditions for using that source in other products you create. Read them carefully and follow their instructions so you are not violating their TOS.
- Make a Terms of Service Agreement: Protect your work and include a TOS agreement with every product download. This allows you to back up a claim made against another seller if you ever need to. Not only that, it helps buyers understand what your rules are so they can use your resources appropriately.
There are many more tips I can provide, but I believe this is a good base for anyone just getting started. I have learned so much along this journey and if you're considering selling on TpT I highly recommend it! If you ever want to ask me specific questions, please feel free to e-mail me at sassypeteach@gmail.com.
As a thank you to my followers, check out my latest freebie here. I hope you enjoy utilizing these frames in your future TpT creations!
November 30, 2016
All I Want For Christmas Is...
I'm making a list and checking it twice, I promise to make what ever you like, any resource you can think of!
Welcome back everyone! This week I really want to do something special for you guys as my followers. Drum roll please...
I want to find out what resources you want to see me create! As we enter the holiday season, I will have much more free time on my hands to get crafting on TpT and what better way to utilize that time than by helping you all! Not to mention, if you offer a suggestion for a resource you would love to see, there will be an added benefit for you. As a TpT seller, I'm constantly trying to think of new and exciting products for my followers and I really want to hear from you! What products do you want to see created? What will you utilize most in your classroom? What are you dying to have, but don't have time to create on your own? I want to know it all! So without further ado, let's get into how this will work and what you can expect from me!
- E-mail your new resource idea that you would love to see me create to sassypeteach@gmail.com. I humbly ask to keep these ideas health and PE related as that is my specialty.
- Be creative! It can be a holiday specific item, a general classroom item, health, PE, the sky is the limit.
- Be as specific or broad as you'd like with your request. Please keep in mind that if you have a specific vision for a project I want to know so I can give you exactly what you're looking for.
- Be sure to leave your TpT store name or the name you would like to see credited in the creation of the project.
- I will create your resource and place it in my store for purchase, BUT...
- I will send you a copy of the resource FOR FREE as a way to say thank you for the idea!
- Credit given to you in the product download!
- Please submit your project idea by December 20, 2016. This will allow me the time I need to create your idea.
My goal is to fill my store with products that will benefit the entire HPE community! We teach such a valuable subject to our students and my goal is to help all educators achieve greatness in the classroom.
So from the Sassy PE Teacher to you this holiday season, Merry Christmas, Happy Chanukah, and Happy Kwanzaa. I hope each of you are blessed throughout this holiday season and beyond.
Note: Special thanks to Ashley Hughes for the header borders, as well as the primary picture background and clip art.
November 22, 2016
VAHPERD Ideas Worth Sharing Part 2: Chicken Football
Last week I shared part one of my VAHPERD Review Series and this week I'm back to share another favorite! I can't wait to use in my classroom, especially as I move in to football lead up games after Thanksgiving Break. Like Crazy Kickball, this game was taught during the "Best We've Ever Seen" presentation. Unfortunately the original source of the game was not cited when presented, but we share free tools and ideas in the PE community all the time, so thank you to the creator of this awesome lead-up game. The name sounds a little strange, but this game is great for teaching so many football concepts!
This game is a great lead-up game for football because it works on moving up and down the field, while downs and yardage can easily be incorporated to advance the concept for middle school students.
Equipment: 4-6 chickens or other item (footballs were not recommended because students tend to throw them and you may need more than 4-6 depending on your class size)
Recommendations: No more than 3-4 team members per group to avoid to much wait time.
Directions: Start with two groups facing each other on opposite sides of the "field" and the chicken in the middle. When groups start, the first member in line for each team will run to the center and rock, paper, scissors. The winner of one round will pick up the chicken and try to run into the opposing teams end zone. The non-winner must return to the end of their line. The next person in line of the non-winning team can run out to meet the winner with the chicken as soon as their teammate is defeated. Once they meet, the member with the chicken drops it where they are and they must rock, paper, scissors again. The winner picks up the chicken and runs to their opponents end zone. This process continues until someone scores. After a score, the chicken is placed back in the middle of the playing area.
Adaptations: This game is great on its own, but if you want to adapt it to have more substance it is absolutely possible. Talking to students about downs and distance, turnovers, and scoring drives can all be incorporated with ease as students move through this game. You can also use other equipment instead of the chicken.
I hope that this game is a hit for you in your classroom! Stay tuned next week to learn all about music in the classroom, as well as a tutorial on how to set the pacer to YOUR OWN MUSIC! My mind was completely blown by this concept and I know yours will be too.
Labels:
classroom games,
cooperative games,
education,
football,
football lead up,
freebie,
games,
health,
PE,
physical education,
resources for teachers,
teachers pay teachers,
tpt,
VAHPERD
November 15, 2016
VAHPERD Ideas Worth Sharing Part 1: Crazy Kickball
I apologize for the hiatus, but I am excited to refocus my efforts and share some truly incredible ideas thanks to fellow professionals in my beautiful home state of Virginia!
The Virginia Association for Health, Physical Education, Recreation, and Dance held it's annual conference in my hometown of Midlothian, VA from November 11 - 13 and it was an action packed weekend! I've been to many VAHPERD conferences, as well as SHAPE Southern District, and the SHAPE National Conference, but this conference was truly spectacular. I left with so many new ideas, knowledge, and research. My plan is to share many of them with you all over the next few weeks.
First up in my VAHPERD series is a game that I can't wait to implement in my own classroom! It is a new twists on an old classic and was featured during a session titled, "The Best We've Ever Seen."
Also known as "Fitness Kickball"
This game is similar to traditional kickball in the sense that there are two teams, one of which is kicking while the other is defending the outfield. This is also where the similarities end so be prepared to move and lose track of the score,
Equipment: You need three balls, five cones, and a bucket or tub large enough to fit three playground balls in. The setup is identical to traditional kick ball, except for the tub directly next to the pitcher.
Recommendations: Always have the teacher pitch. Anyone who has played kickball before knows this is the cardinal rule!
Directions: Start the game with the three playground balls inside the tub. One at a time and at 3-4 second intervals, pitch the balls to the kicking team. {You can vary the rules on how students have to kick for your classroom, but a general rule of thumb is to ensure the ball moves forward (bunts count).} Once the ball has been kicked, students are trying to run the bases one time as quickly as possible. When they return to home base, they move to the end of the line. Don't worry about this line part, it moves very quickly... The fielding team is trying to collect all three balls into the tub at the same time. Once they do this successfully, the teams will switch roles and continue play.
Like all games there are certainly pros and cons to this one. What I love about this game is that it gets kids moving! Unlike traditional kickball when only one student is running at a time, this version allows kids to constantly move on both sides of the ball. Student interest and involvement is off the charts with this as well! Cons of this game revolve around the lack of standards content. You can definitely argue that fitness concepts can be incorporated, but without adaptations this game will not be content focused and therefore shouldn't be played on a regular basis.
Adaptations: Now, the good news about the cons is that we can make some small changes to incorporate standards. Incorporating health standards into PE content is an excellent way to make fun games more educationally focused. Tell students that the playground balls are oxygen, the kickers are arteries who have to send the oxygen through the body, while outfielders are veins who need to take the carbon dioxide back to the lungs {the tub} to be dumped so blood can be oxygenated. All of a sudden, your students are learning about the circulatory system while improving cardiovascular endurance in a fun, engaging way.
I hope that this game is a hit for you in your classroom! Stay tuned next week to learn all about Chicken Football, an exciting warm-up game that teaches basic football movement, cooperation, and critical thinking.
July 24, 2016
Back to School Newsletters
It sure has been a while since my last post. I will briefly fill you in. Since school let out, I have been swarmed in camp. I am the program director for a local YMCA camp and that means I'm responsible for writing ten curriculum's for three age groups. Yes, that is a lot of additional work and it has really taken me away from my store and my blog, but I'm back!
Today, I want to focus on a topic that I'm noticing is somewhat controversial and that is Back to School Newsletters (or Meet the Teacher forms). My thought process began when the TpT Facebook page posted an ADORABLE newsletter format on their page. I loved the concept, went immediately to the sellers site, and purchased the resource. It was so fun and colorful and also completely editable!
Now, I decided to not only leave feedback, but to comment on the facebook post to share my excitement! I was shocked to see so many negative comments on the feed about the concept of Meet the Teacher newsletters. Advocates against expressed that it was too personal and parents didn't need to know all of this information about them. Proponents for the newsletters felt it was an excellent way to let parents know who they're giving their children too for the next nine months.
This brief synopsis leaves the question: To Meet the Teach newsletter or to not?
My simple and profound answer is that we need to do what works for us in our classrooms and respect others for their decisions as well, whether they agree with us or not. I was really taken aback by the negativity on the original FB post. We are a community of educators who all share a common goal. The teacher responsible for the newsletter they shared replied to my comment simply for being supportive. Isn't that how each of us should be?
Now for the good part {in my humble opinion anyway}... The contact box is covered for obvious reasons. Y'all don't need to know EVERYthing.
It dawned on me after I finished my version that this newsletter concept is generally geared toward elementary teachers... yet here I am in middle school loving the idea. Now that I'm in a school and a department that values work and collaborates together (as well as being in my fourth year of teaching), I have a lot more time to focus on the "add-ons" to my classroom.
The idea of a Meet the Teacher newsletter is amazing, but I also like the idea of sending home a monthly newsletter as well to keep parents up-to-date on what we've been working on. Who says this method has to be limited to elementary teachers? I'm ready to set higher expectations for my students, my parents, and for myself. I'm excited and ready for the upcoming school year.
Today, I want to focus on a topic that I'm noticing is somewhat controversial and that is Back to School Newsletters (or Meet the Teacher forms). My thought process began when the TpT Facebook page posted an ADORABLE newsletter format on their page. I loved the concept, went immediately to the sellers site, and purchased the resource. It was so fun and colorful and also completely editable!
Now, I decided to not only leave feedback, but to comment on the facebook post to share my excitement! I was shocked to see so many negative comments on the feed about the concept of Meet the Teacher newsletters. Advocates against expressed that it was too personal and parents didn't need to know all of this information about them. Proponents for the newsletters felt it was an excellent way to let parents know who they're giving their children too for the next nine months.
This brief synopsis leaves the question: To Meet the Teach newsletter or to not?
My simple and profound answer is that we need to do what works for us in our classrooms and respect others for their decisions as well, whether they agree with us or not. I was really taken aback by the negativity on the original FB post. We are a community of educators who all share a common goal. The teacher responsible for the newsletter they shared replied to my comment simply for being supportive. Isn't that how each of us should be?
Now for the good part {in my humble opinion anyway}... The contact box is covered for obvious reasons. Y'all don't need to know EVERYthing.
The idea of a Meet the Teacher newsletter is amazing, but I also like the idea of sending home a monthly newsletter as well to keep parents up-to-date on what we've been working on. Who says this method has to be limited to elementary teachers? I'm ready to set higher expectations for my students, my parents, and for myself. I'm excited and ready for the upcoming school year.
June 1, 2016
Plickers in PE: Using QR Codes For Quick Assessment
If you have not be exposed to the glory that is Plickers, then you are missing out on a PHENOMENAL resource for your classroom. I just learned about them in a professional development seminar prior to this school year, so I haven't implemented them in my PE classroom yet, but I use them daily in my health room!
Plickers are a QR code system that allows each student to answer questions placed on your projector/smart board. The question can be generated online or through your mobile device! Another benefit of Plickers is that it is free to use! Visit Plickers here to sign-up and download your free printable cards.
You can also purchase a set of laminated cards for $20. If you want to download and print the free cards to laminate yourself, you can, but it's important to note you can only use matte finish laminating paper. The traditional laminating sheets will cause the Plickers to malfunction due to the glare off the gloss finish.
Recommendations for creating your Plickers set:
- Buying the matte laminated cards is a worthwhile investment. They are sold through Amazon. The only downside to purchasing them through Amazon (recommended from the Plickers site) is that they only sell the standard pack of 40. If you need more than 40 unique cards, buying two sets will not fix this issue.
- If you decide to print the cards yourself, I recommend printing on card stock as opposed to traditional computer paper. This will help maintain the integrity of the cards for a longer period of time, especially if you decided not to laminate them yourself.
Getting Setup & Organized:
- Build in an organizational tool in your gym. I am a huge fan of pocket charts for this purpose. They're easy to hang and make taking Plickers out and putting them back in a breeze. S&S has a great packet chart here. It's 20"x 24" and features 30 clear and 30 yellow pockets.
- At the beginning of the school year, assign each student a number (per class period). When students enter the gym, they grab their card (huge help for attendance to avoid squad lines and down time). Take your phone, scan any leftover cards and instantly know who is not in class today.
Teach students how to use the Plickers. (A) Each Plicker has a number on every corner of the QR code. This is the number I assign to students. (B) Each Plicker then has a unique letter on each side of the QR code (A, B, C, D) (C) You can ask true/false questions with A = true and B= false.
TO ASSIST MY STUDENTS, I WRITE THE LETTERS ON THE BACK OF THE CARD. This prevents them from flipping back and forth for every question. You can see a sample of this below. Now, students can simply look at the back side of the card to know which answer they should be holding up.- Now, you can easily scan the QR codes with your phone to gather formative feedback while teaching in your classroom.
How to Implement in PE
Now comes the tricky part.. How do you keep track of all these cards while in physical education class!? So many of us in phys. ed are hesitant to use Plickers in the gym because it seems like too much of a headache, but in reality Plickers are easy to implement!
You can enter questions ahead of time or enter them real time as you see needs developing in class. You can do this online or on your phone. You'll then need to click on the application on your phone, select the appropriate question, and scan to collect your data.
- Teaching a new skill? Great, Plickers can allow you to see who is grasping essential concepts and who still needs more practice.
For example, let's say you're teaching how to plant your non-dominant foot beside the ball in a soccer unit. You want to see if all of your students understand why that's important instead of calling on a few kids who raise their hands. Propose the following question: True or False - placing your non-dominant foot next to the ball in a soccer kick allows you to direct the ball properly. Students would hold up their Plickers with A for True or B for False and you now know exactly who gets it and who doesn't. Now open up the discussion to help those students who don't understand why! - Formal Formatives? Don't have time for a sit down quiz, but want to see where your students are with rules or concepts of a sport? Read (or display) the question, give the answers and record student responses in no time.
- Class Exit Tickets? Great, save paper, incorporate technology, and avoid grading by having exit slip questions plugged into your Plickers account.
- Polls and classroom surveys are also possible with Plickers. This is perfect for testing a new game or drill to see how your students respond to it. For these types of questions, it's simple to mark every answer for a question correct or leave one as incorrect (personal preference of the teacher) to see if it's a hit or a flop.
This is just the tip of the iceberg for possibilities with Plickers! There are so many additional resources that you can find through Gopher and SHAPE America. These were just a few tips to help you get started and I would LOVE to hear how you incorporate Plickers into your own classroom!
May 25, 2016
Specific Feedback: Why It Matters & How You Can Implement It
Teachers across the board hear these expressions often... "Great job! Good work! Nicely done! It looks great!" Some of us might even say them to our students often. Even though we're trying to reinforce students and their learning, we're actually doing them a disservice by not being more specific!
Specific feedback was discussed in every undergraduate and graduate teaching class I ever took. We practiced how to give specific feedback, how to recognize examples of unspecific feedback, and how to rework unspecific feedback into specific feedback. All of this practice, all of this repetition, and yet, from time to time, I find myself still providing unspecific feedback to my students. I typically catch myself and rework the feedback each time, but it still happens even though I know all of this! Why?
Unspecific feedback stems from rushing to get to as many students as possible without providing enough individual attention to give them a specific critic or emphasis. It's the easy way out for feedback and every educator has fallen into the trap at some point, but we need to be diligent about providing specific feedback. Our students engagement is depending on it!
According to an exert of an article by Bryan Goodwin and Kirsten Miller in September 2012, researchers have discovered that video games are widely successful because they provide large amounts of specific feedback:
"Many parents have observed the irony that a child who shows little perseverance when practicing piano or doing homework will joyfully commit countless hours to mastering Guitar Hero or other video games. In fact, by the time the average U.S. adolescent turns 21, he or she will have spent 10,000 hours playing video games (Prensky, 2001)—which is, as it turns out, about the same amount of time necessary to fully master a sport, musical instrument, or area of professional expertise (Ericsson, Krampe, & Tesch-Romer, 1993).
According to Prensky (2007), the addictiveness of video games can be partly attributed to the constant stream of feedback they provide. At each level of the game, players learn what works and what doesn't, and they can immediately use that knowledge to advance to more challenging levels. And researchers have found that the same dynamic applies in education: One of the most powerful keys to unlocking student motivation and perseverance is feedback."
I recommend reading the entire article here. I wish I could quote the entire thing within this post, but I will let the eloquence of the original authors shine through. There is a lot more evidence cited as to why specific feedback is so important!
So this begs the question, how can we incorporate SPECIFIC feedback into our classrooms?
(Note: I am approaching this from a physical education perspective, but all classrooms benefit from specific feedback).
In my classroom, my class size ranges from 19 students up to 31 students. Many teachers, especially in physical education, have class sizes double or even triple that! Getting to every student can be an enormous task, but there are a few tricks to help us out, regardless of how large (or small) our classroom may be.
1. Pick one item to critique each class period. Learning is a step-by-step process and our physical education classrooms are no different. When we're teaching students the steps in how to swing a baseball bat, they aren't going to get every step right the first time! In teaching the baseball swing, start in steps and critique/provide feedback as you move through. For example, day one of teaching the swing, focus on providing feedback for their hand position. This will allow you to be specific while still reaching each child. If you try to focus on all seven to eight components (depending on your style) you'll never reach every child and you'll be forced to provide unspecific feedback.
Specific feedback sounds like:
- "You're doing an excellent job of keeping your dominant hand on the top of your grip while swinging the bat."
- "I can see you're working very hard on your swing, but remember to place your dominant hand on top of your non-dominant hand while holding the bat during your swing."
2. Avoid standardized feedback cards. I'm noticing a trend on TpT of seller's offering feedback cards with cute phrases like "Great job in class today!" or "You rocked PE today!" and while I'm sure those are nice, they don't tell your students WHAT they did a good job with. If you want to provide feedback cards to your students (which I think is awesome) you need to provide them with specifically created cards for them and your activity. Does this take a lot more time? Yes, but aren't our students worth the investment? We're teaching to make a difference! Making specific feedback cards takes longer and therefore I provide them once per unit. This is a picture of a feedback card I typically give to my students. They are not available for sale on my TpT store, but I would anticipate them becoming available over the summer.
3. Complement long-term feedback with short-term feedback. The research is showing that students respond best to immediate feedback. Provide informal, specific feedback daily to every child and then compliment that feedback once a skill has been mastered (or improved) in the long-term. In my classroom, I provide daily feedback on the skill focus of the day and I provide long-term feedback with my cards at the end of the unit.
4. Assess students clearly and provide specific feedback. When my students participate in an assessment, they are told exactly what I am looking for. In our bowling unit, I assessed four key areas of importance to me (hand position, three-step approach, stepping in opposition, and follow-through). When I assess, I utilize a trials method of two trials per skill. If the skill is present students receive a 1, if the skill is questionable or absent the student receives a 0. The best trial is scored for their overall grade. These skills are the focus of the unit and each receives specific feedback in the four days leading up to our overall assessment. My students know what is being assessed, what is being looked at, and how to perform each skill. I do not provide feedback during assessment, but instead utilize the specific feedback sheets after assessments have been given to share what students did well and where they can improve.
Although this post was specific to physical education, specific feedback should be given in every subject area across the spectrum. In ELA classrooms, teachers should be writing constructive and specific feedback when editing writing assignment. As the article I linked eludes to, simply writing awkward next to a sentence doesn't give the student much to work with. What about the sentences was awkward? How can they fix it? Is it the whole sentence or a small part? Is the verbiage awkward or is the sentence structure awkward? I know grading essays can take a very large chunk of time, but are we really help students writing improve by providing such vague direction?
I personally suffered through this during my IRB process in graduate school. One professor edited my drafts and provided unspecific feedback and when it came time to turn in the final, the second professor gave me an incomplete and required me to rewrite the enter paper. Her logic was "he should have known better." So why was I, as the student, being punished for something she blatantly admitted wasn't my fault?
Specific feedback is what helps guide students in the learning process. It allows them to process information, correct their wrongs, and move forward to more challenging topics. It is our responsibility as educators to ensure our students are able to "level up" and progress in our classrooms.
May 18, 2016
Classroom Favorite's: Treasure Island
I don't know about the rest of you, but it just won't stop raining here in Virginia! Thankfully, my class was in health last week so the rain didn't have a huge impact, but now we're back in PE and the rain is really messing with our spring sports rotation. What can we do that is still educational, fun. and engaging for students while accommodating three classes in the gym? TREASURE ISLAND.
This game focuses on cooperative skills such as communication, teamwork, non-verbal communication and cues, as well as critical thinking. Students ask to play all the time as it is a class wide favorite and all ages (elementary, middle, and high school) can benefit from this activity.
Equipment is minimal and can be easily manipulated depending on your class size and equipment availability.
Equipment Needed:
- Cones (Optional)
- Hula Hoops or Mats
- Pool Noodles
- Jump Ropes
- Poly Spots
- Scooters
You can easily substitute any of these items for other equipment you have in your school. If you want the game to last longer, you can also add more types of equipment to this list.
Activity Directions:
Students will attempt to get their entire team from one side of the gym to the other. That must use all of the equipment to get across and no part of their body is allowed to touch the floor. If they touch the floor, that individual must go back to the starting point. The mat (or hula hoop) in the middle acts as an island. They are allowed to stand in the island to assist teammates in crossing, but the island cannot move. Once the group has made it across once, they must select one of their items to give up. This should be a team decision, not just one or two people. They will then attempt to make it back across. Once completed, they will repeat the process of giving up an item and returning across until they have only one item left!
There are a few rules to remember as we move through this activity:
- Students should not be allowed to stand on top of scooters! Bottoms, knees, and bellies only.
- Honesty is key when acknowledging that a body part has touched the ground.
- Students are allowed to pick which piece they would like to forfeit.
- Encourage students to be creative while adhering to the game rules.
Below you will find some of my favorites from my own classroom. I love how creative the kids can get with trying to make it across. We've seen "rockets" and jump rope balance beams, pull systems and rope lassos. There is never a dull moment in treasure island!
I hope you are able to utilize Treasure Island in your own classroom with as much success as I have in mine! It's a fun game that works on so many different social and cooperative skills... The kids won't even realize they're learning.
May 11, 2016
How to Create Review Game Slideshows
Do you ever wonder how all of these review games are made? How do they link all the slides together? Where do you even start!? Well folks, you're in luck because today that's exactly what I plan on showing you.
1. Start by opening PowerPoint. I will be using PowerPoint 2010 for Windows, but the commands are virtually the same if you're using 2007.
2. Select your design. I always do this first so I know how everything I set up will work. Click on the design tab and then pick your favorite. If you want to design a custom slideshow you can select your fonts under the design tab and your background by right clicking on the slide itself and selecting the file from your own computer.
3. Input your introductory information. This is pretty simple and no different from any other PowerPoint creation.
4. Create your table. Now you can create your review game menu! Create a new slide and in the center area, click on the table icon.
Your finalized table will look like this:
5. Input your categories and point values. This is simple insertion and is completely up to you and what you want your game to be about! I prefer my tables to be centered. Go to layout and then select the two centering tools.
Once I have my table set, I input the data I am going to hyperlink!
6. Add the number of slides you will need for your game. You will need two slides per question, one for the actual question and the other for the answer. I recommend labeling each slide as you go because it will make hyperlinking in the next step that much easier.
Once you have your slides set up, you're ready to hyperlink! Go back to your main menu slide and highlight the "100" for your first category. Once highlighted, go to the insert tab at the top of the program and hit "Hyperlink."
Once you've selected hyperlink a dialogue box will appear. You will need to select "Place in this document" and select the slide matching the game menu. For example, if you highlighted Weather 100 (like I did), you will want to make sure you select the Weather - 100 slide (this is why titling your slides in the previous step was so important).
After you've successfully hyperlinked your slide to the game menu, you will need to create a "back to menu" link as well. Go to the answer slide for the 100 question you just hyperlinked. Go back to insert and select text box. Draw your box in the bottom right corner of the slide and type in "Back to Menu."
Repeat the hyperlinking process by highlighting the "Back to Menu" and select hyperlink, place in this document, and select the game menu slide.
7. Repeat for each slide. Repeat the hyperlinking process until you've reached the whole slideshow! A shortcut you can utilize is copying the text box "Back to Menu" and pasting it on the return slides. The hyperlink will stay in tact and it will save you a lot of time.
See! It's that easy! If you're looking at these steps and thinking, "this is too much for me... I don't have enough time to do this" don't worry. I have review game templates in my store for four and six categories (with four questions per category).
Good luck with your creation!
Subscribe to:
Comments (Atom)


