Freebies My Classroom About Me Home Instagram TeachersPayTeachers Pinterest Email Facebook BlogLovin Image Map
Showing posts with label teaching. Show all posts

January 24, 2017

Brain Breaks Breakdown!

It is that time of year again! Whether you’re in elementary, middle, or high school, students are spending more time inside and less time moving. In elementary school, a lot of students are missing outdoor recess due to cold temperatures or bad weather. Middle and high school students often feel sluggish or tried from lack of sleep and less movement throughout their day. We as educators can do something about this by incorporating brain breaks into our classrooms!

     Brain breaks are kind of my thing. I have worked as a summer camp counselor or director for seven summers after attending camps as a child for 10 years. I teach physical education and I coach… I HAVE A TON OF BRAIN BREAK MATERIAL.

     Before we dive in I have what I believe is an important question… WHY do teachers think brain breaks will only benefit elementary students?! Do not get me wrong, brain breaks are perfect for elementary students, but they are just as beneficial for middle and high school students! I am a middle school educator myself and when I’m in a 90 minute health class, I try to incorporate at least three five minute brain breaks. My students tell me all the time how much they enjoy them and how their other teachers don’t perform them. Middle school teachers listen up, YOUR STUDENTS WANT BRAIN BREAKS.

Let’s get started with some of my favorite web-based brain breaks! Some of these are pretty standard, especially at the elementary level, but you can incorporate them into middle school too.


  1. Go Noodle – My adapted PE students LOVE using this website. They have so much variety! This is also a huge hit with many of my elementary teacher friends. It offers guided dance, sing-a-long, fitness, sport skills review, silly random videos, and so much more!
  2. Brain Pop – When limited on space due to larger class sizes or being crammed into a space that doesn't allow for a ton of movement, Brain Pop is a great review tool and helps kids have fun while learning. While not a true brain break, it does still offer many tools that make students feel like they're taking a breather.
  3. Just Dance YouTube Chanel – I was surprised to learn that middle school students can still love Just Dance! They love requesting songs, getting up and moving, while singing along. I have had this work really well in sixth grade, while seventh is hit or miss, and eighth graders are typically past it.
Let's get into the fun part... Brain Break ideas to implement in your classroom! Below is a detailed list of brain breaks I use (and my students love) on a regular basis {in middle school}:

  1. Yoga – What I love about yoga as a brain break is the calming effect it has on students, while challenging them to build strength in different poses. While this isn't a huge movement activity, it helps students refocus to improve classroom work and effectiveness. Being a Pinterest queen, there is an excellent resource here on yoga poses for younger students. Middle and high schools students can easily perform more advanced yoga poses which can be found here.
  2. Meet Me in the Middle  – Have students pair up with a partner and stand on opposite sides of the room. Call out an activity to do (i.e. meet in the middle and give your partner a high five with your right hand). Students walk to the center and meet their partner to do the activity. After completing the activity, students turn and walk back to their original places. Add one activity each round. {For example: 1st time – meet partner in the middle and do a right-handed high five. 2nd time – right-handed high five, add left-handed high five. 3rd time – right-handed high five, left-handed high five, call out favorite physical activity}. Adjust this activity to fit your needs and what your students enjoy. I will often add things like, "meet in the middle and perform five body squats" to make the activity more challenging.
  3. 10 Second Fitness  –  Students pair up with a partner and perform the teacher-designated fitness activity (see examples below) for 10 seconds. As one student performs the activity, the other partner counts the number of repetitions. The students switch, and partner two does the activity. Ask students to do the activity as quickly as they can. Exercise examples include:

              Forward straddle jump
              Side straddle jump
              Side jumps
              Front and back jumps
              Right foot jump
              Left foot jump
              Scissor jump
              Alternating Lunges
              Body Squats
  4. Group Juggle  –  Students should group up in table groups of 4-5 members and each group should have a small ball or object to throw and catch. On the signal, groups must work together to pass the ball to every member of their group without repeating. Once they complete the task, they should jump up and say "finished." Alternate this activity by having groups throw in the same pattern backwards, repeat the forward pattern for time, add a second object to throw, etc.
  5. Trainwreck  –  Have the entire class sit in a circle with one student in the middle. The student in the middle can either say a fun fact about themselves or a fun fact they learned in class. Students who agree or like the same thing will stand up and find a new place to sit. They cannot move directly next to their current seat or return to the same seat. The last student left is the new middle man. Repeat rounds as needed.
  6. Hot Tamale  –  One student exits the classroom. The rest of the class watches the teacher hide the “hot tamale” (can be any object) somewhere in the classroom. The student who exited the classroom re-enters. The rest of the class tries to guide him or her to the hidden tamale by performing various physical activities {listed below}, with each activity corresponding to a different direction. Students are not allowed to talk. Once the student locates the hidden “hot tamale,” another student is selected to exit the classroom, and the “hot tamale” is hidden in another location so that the game can be repeated.

    Write the following motions on the board for all students to see:
              Move backwards - back stroke (swimming motion)
              Move forward - march in place
              Move to either side - side stretch in the direction of the hot tamale
              Up higher - climbing ladder motion
              Down lower - squats
              Within 1 foot of the tamale - students pretend they are stepping on hot coals (in place) 
These examples are just a few of the brain breaks I have done with middle school students and they are also some of their favorites as well! Brain breaks don't have to be limited to elementary students. Many middle schools and most high schools operate on block schedules that keep kids in one class for a longer period of time. Taking five to 10 minutes out of our class period to get them moving and refocused will help us as educators in the long run with behavior management and it will help students be more focused and attentive. 

Do you have any go-to brain breaks that you use in your classroom!? Share your ideas in the comment section below!

January 10, 2017

How to Teach a Middle School Bowling Unit

Bowling is an excellent indoor recreation sport that allows students to learn more about skill-related fitness components, as well as etiquette, sportsmanship, and cooperative skills! There is no better time to teach bowling than right now in the cold of winter. Your classes are already indoors and in most cases, you're forced to combine with other classes due to limited space. Bowling is a wonderful sport that can accommodate each of these circumstances while still getting students moving and grooving! So if you're looking for advice on how to start your own bowling unit or if you're looking for new ideas to spice up your existing unit, then keep reading! If you're looking for an awesome freebie, you'll find access to my manual scoring assessment at the end of this post!

Before Getting Started:

It's important to analyze your equipment and potential equipment needs before beginning any unit in your classroom. It's also essential to be creative, especially if you don't have "real" bowling equipment. My school is very fortunate to have access to authentic bowling pins for 10 lanes, 10 rubber or plastic bowling balls {I do not recommend purchasing plastic bowling balls - more on that later}, and mats that act as bumpers at the far end of each lane. Your school may not have this equipment (and I've been there before) so you may need to be more creative.

If you have bowling equipment already, fantastic! If you don't currently have bowling equipment, but you have the resources to purchase equipment, here are my top recommendations for bowling equipment:

Pins:

Balls:
Complete Sets:
You can certainly find cheaper options, but what I love about Gopher is their lifetime replacement guarantee. When an item breaks or wears down, they will replace it, no questions asked. My department chair and I do this frequently. Flag House also has the widest variety of options.

I'm sure some of you are looking at these prices and thinking, "Wow, these all look great, but I simply don't have the budget to purchase these items!" You're in luck because there are a ton of items you probably already have in your storage closet that can be just as effective!

Courtesy of Pinterest
https://www.pinterest.com/pin/285204588875182233/
Creative Pin Suggestions:
  • Empty 2-Liter Bottles
  • Paper Towel Rolls (glue three together to help them stand better)
  • PVC Pipe (cut in 10-15 inch lengths)
  • Wide Pool Noodles (cut in 10-15 inch lengths)

Courtesy of S&S Worldwide
www.ssww.com


Creative Ball Suggestions:
  • Traditional Foam Balls (best suggestion)
  • Soccer Balls (size four works best)
  • Basketball (not ideal as they can be too big for students hands)
Setting Up Your Bowling Unit:

This will vary based on your school, your PE/Health rotations and other factors, but my department works in a two week block schedule format. This allows me to teach five 90-minute lessons during each PE rotation. I breakdown my skill development into each of the five days:
  • Day 1: Introduction to Basic Skills & Vocabulary, Peer Evaluation
  • Day 2: Review Basic Skills, Station Skills, Self-Assessment
  • Day 3: Station Skills, Introduce Manual Scoring, Peer Assessment
  • Day 4: Traditional Bowling, Manual Scoring Skills, Self-Assessment
  • Day 5: Summative Skill Assessment, Summative Manual Scoring Assessment

In my 90-minute class periods, I eliminate 14-20 total minutes (before and after class) for changing and instant activity (before class only). I also include a 10-20 minute fitness activity before getting into the main topic, in this case bowling, which gives me about 50 minutes to teach content. You can easily manipulate these times to work with your own schedule. At my former school, I had 50 minute class periods. I eliminated 12 minutes for students to change (includes before class - 6 min - and after class - 6 min) and that left approximately 38 minutes for content. If your schedule is closer to this time frame, I eliminate a fitness activity when bowling because it requires so much setup throughout the activity. 

Day One | Introduction to Basic Skills

I focus on ball grip and a three step approach during day one. Educators differ on the type of approach taught, but as long as students are releasing the ball with the opposite (or non-dominant) foot in front, the number of steps in the approach can vary. After brief instruction and demonstration, I break students into groups of four.

To the left is the setup I use in my own classroom. We have 10 lanes set up in our gym with four students at each lane. Two students begin at the top of the lane as the bowlers, while the other two begin at the bottom of the lane . (1) Bowler one rolls their first bowl, with bower two providing verbal feedback on hand grip and three step approach. (2) The two team members on the bottom of the lane, move pins that have been knocked over to the side. (3) Bowler one then bowls their second ball, with bowler two again providing verbal feedback. (4) The two team members reset the pins so all ten are standing. (5) Bowler two now takes their turn, with all other steps repeating. (6) Once bowler two has finished, they move to the bottom of the lane for pin setup, while the previous team members move to the top of the lane to bowl their turns.

As the instructor, I am moving around with each group to fix form, provide formative feedback, and check for understanding. If I see a pattern of errors or misunderstanding, I will stop the group, briefly explain the issue, get them working again, and then go back to working with students one on one. 

I also have a peer evaluation form. Each student fills out a form about the partner they observed bowling with helpful, respectful, and constructive feedback.

Day Two | Review Basic Skills, Station Skills, Self-Assessment

Prior to class, I would have reviewed peer feedback. After my students have completed the instant activity and fitness activity for the day, I quickly review and demonstrate the basic skill learned in day one and hand back their peer feedback from the previous class. On day two, I add station task cards to each lane. Students work through various setups throughout class and track their progress. For example, a station task card looks like:


Each student is given a worksheet to track which stations they have visited and how they did. Students think it's fun to work on different shots. This worksheet becomes their self-assessment later on when they review it before turn in. I grade the sheet for completion, provide feedback, and give it back during the next class period.

Day 3 | Station Skills, Introduce Manual Scoring, Peer Assessment

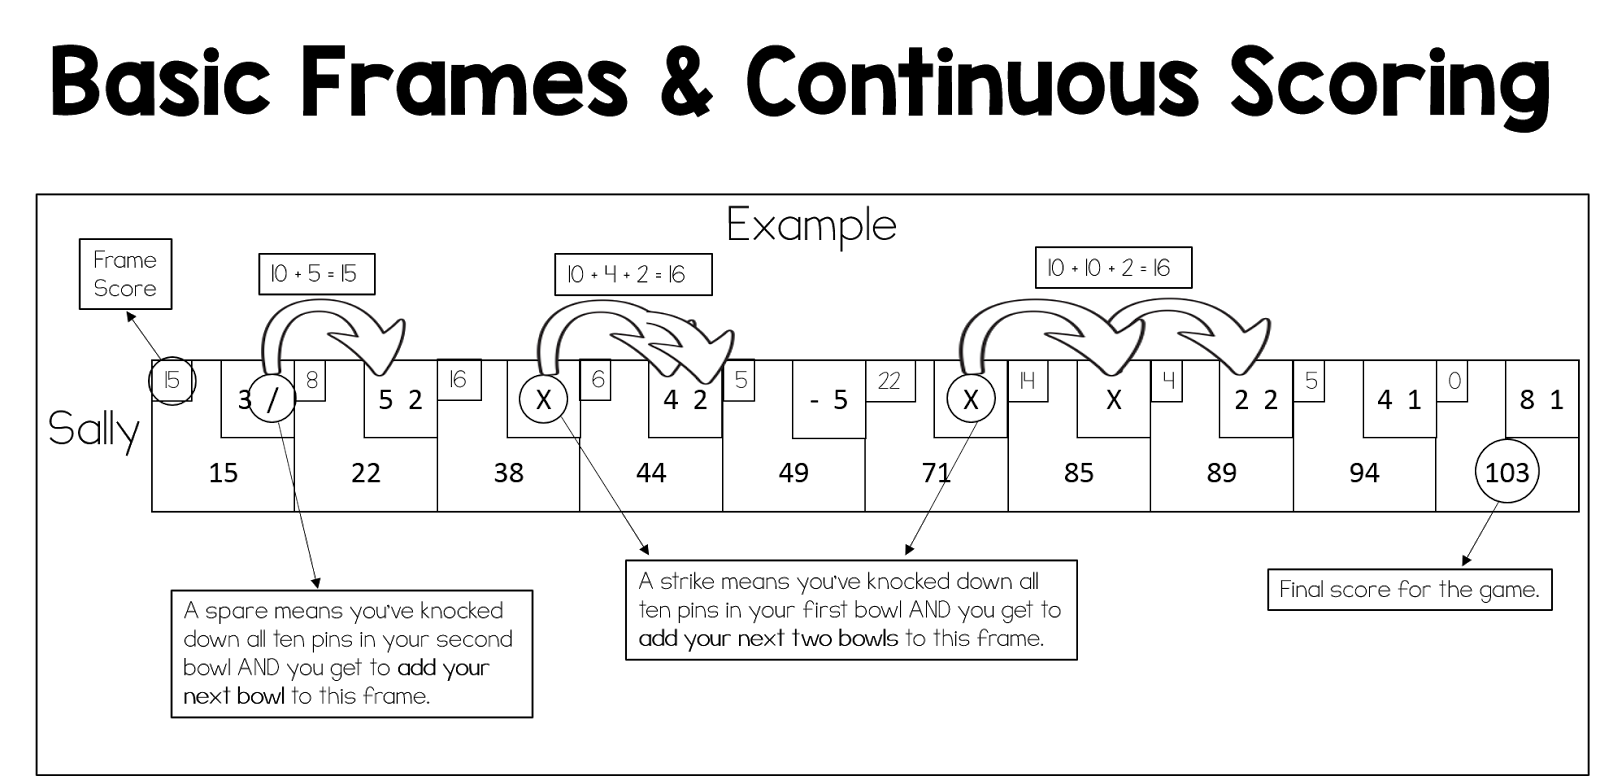
Students continue to work on stations, often returning to station they've struggled with. There is a station for every group and the general rule is that if a station is occupied, they must select another station. This is also the day I introduce manual scoring. Students often have no idea how scoring in this sport works because they've never had to track it themselves. I start by teaching basic frames and continuous scoring.


Introducing spares and strikes is often a skill I wait to introduce until seventh or eighth grade, but only you know your classes! If you think they can take those skills on sooner, I have this visual to assist students with understanding them.


Day 4 | Traditional Bowling, Manual Scoring Skills, Self-Assessment

On day four of my bowling unit, I take away the stations and let students practice their new skills in a traditional bowling environment. Students also keep track of their own scores and apply their scoring knowledge in a formative setting. 

My role on day three is to facilitate feedback, assist with scoring, provide opportunities to challenge students, and collect/review bowling score cards. I print my scorecards from Print Your Brackets. They are easy to print and perfect for classroom use!

Day 5 | Summative Skill Assessment, Summative Manual Scoring Assessment

Day five is assessment day and I have been notifying my students about this every day leading up to it. My assessment style is informative and, in my opinion, always students to test in a comfortable environment without fear of making mistakes. 

Skill Assessment: I allow students to pick their own groups and lane. I move to the students lane, inform them that I will be assessing their next bowl, notify them what I am looking for, and allow them two opportunities to find success. I place my criteria on an Excel Spread sheet with each students name pre-entered and fill in their results as I record them. I assess with a simple yes or no system. The individual skill is either present or not. If the skill is present, it is marked with a Y and if it is not present or incomplete, it is marked with a N.

Scoring Assessment: Students complete a pre-filled scoring sheet for four bowlers. I give my students the option on which scores they would like to tally. For example, in my assessment, I ask students to complete two of the four scores. They must score Corey or Emily as one of the two options and Michael or Patricia as the second option.

I also tell my students that if they want to work through all four, I will count their best two. I award one point per frame. I also grade based off the individual frames. 

For example, if a student is working on Corey and scores 9 on frame one (correct), 19 on frame two (incorrect), and 27 on the third frame (half correct), they would earn two total points. They answered frame one correctly (+1), but answered frame two incorrectly (+0). They technically answered frame three correctly as the frame score is 8, but now they've based it off their incorrect score in frame two. They receive a point because they scored that frame correctly. You can access a copy of my scoring assessment and answer key for free in my store! While you're there you can also see my Bowling Classroom Newsletter to help keep parents updated on the latest class events!

And there you have it! This is how I like to run my own middle school bowling unit. Tell me what you think or show me how you run your own bowling unit! I love to see how other physical educators are teaching in their classrooms. If you have any questions, please don't hesitate to shoot me an e-mail at sassypeteach@gmail.com! Also be sure to follow me on twitter and instagram @sassypeteach as I'll be teaching my bowling unit over the next two weeks!

May 25, 2016

Specific Feedback: Why It Matters & How You Can Implement It


Teachers across the board hear these expressions often... "Great job! Good work! Nicely done! It looks great!" Some of us might even say them to our students often. Even though we're trying to reinforce students and their learning, we're actually doing them a disservice by not being more specific!

Specific feedback was discussed in every undergraduate and graduate teaching class I ever took. We practiced how to give specific feedback, how to recognize examples of unspecific feedback, and how to rework unspecific feedback into specific feedback. All of this practice, all of this repetition, and yet, from time to time, I find myself still providing unspecific feedback to my students. I typically catch myself and rework the feedback each time, but it still happens even though I know all of this! Why?

Unspecific feedback stems from rushing to get to as many students as possible without providing enough individual attention to give them a specific critic or emphasis. It's the easy way out for feedback and every educator has fallen into the trap at some point, but we need to be diligent about providing specific feedback. Our students engagement is depending on it!

According to an exert of an article by Bryan Goodwin and Kirsten Miller in September 2012, researchers have discovered that video games are widely successful because they provide large amounts of specific feedback:

"Many parents have observed the irony that a child who shows little perseverance when practicing piano or doing homework will joyfully commit countless hours to mastering Guitar Hero or other video games. In fact, by the time the average U.S. adolescent turns 21, he or she will have spent 10,000 hours playing video games (Prensky, 2001)—which is, as it turns out, about the same amount of time necessary to fully master a sport, musical instrument, or area of professional expertise (Ericsson, Krampe, & Tesch-Romer, 1993).
According to Prensky (2007), the addictiveness of video games can be partly attributed to the constant stream of feedback they provide. At each level of the game, players learn what works and what doesn't, and they can immediately use that knowledge to advance to more challenging levels. And researchers have found that the same dynamic applies in education: One of the most powerful keys to unlocking student motivation and perseverance is feedback."

I recommend reading the entire article here. I wish I could quote the entire thing within this post, but I will let the eloquence of the original authors shine through. There is a lot more evidence cited as to why specific feedback is so important!

So this begs the question, how can we incorporate SPECIFIC feedback into our classrooms? 
(Note: I am approaching this from a physical education perspective, but all classrooms benefit from specific feedback).

In my classroom, my class size ranges from 19 students up to 31 students. Many teachers, especially in physical education, have class sizes double or even triple that! Getting to every student can be an enormous task, but there are a few tricks to help us out, regardless of how large (or small) our classroom may be.

1. Pick one item to critique each class period. Learning is a step-by-step process and our physical education classrooms are no different. When we're teaching students the steps in how to swing a baseball bat, they aren't going to get every step right the first time! In teaching the baseball swing, start in steps and critique/provide feedback as you move through. For example, day one of teaching the swing, focus on providing feedback for their hand position. This will allow you to be specific while still reaching each child. If you try to focus on all seven to eight components (depending on your style) you'll never reach every child and you'll be forced to provide unspecific feedback.
Specific feedback sounds like:
  • "You're doing an excellent job of keeping your dominant hand on the top of your grip while swinging the bat."
  • "I can see you're working very hard on your swing, but remember to place your dominant hand on top of your non-dominant hand while holding the bat during your swing."
2. Avoid standardized feedback cards. I'm noticing a trend on TpT of seller's offering feedback cards with cute phrases like "Great job in class today!" or "You rocked PE today!" and while I'm sure those are nice, they don't tell your students WHAT they did a good job with. If you want to provide feedback cards to your students (which I think is awesome) you need to provide them with specifically created cards for them and your activity. Does this take a lot more time? Yes, but aren't our students worth the investment? We're teaching to make a difference! Making specific feedback cards takes longer and therefore I provide them once per unit. This is a picture of a feedback card I typically give to my students. They are not available for sale on my TpT store, but I would anticipate them becoming available over the summer. 

3. Complement long-term feedback with short-term feedback. The research is showing that students respond best to immediate feedback. Provide informal, specific feedback daily to every child and then compliment that feedback once a skill has been mastered (or improved) in the long-term. In my classroom, I provide daily feedback on the skill focus of the day and I provide long-term feedback with my cards at the end of the unit. 

4. Assess students clearly and provide specific feedback. When my students participate in an assessment, they are told exactly what I am looking for. In our bowling unit, I assessed four key areas of importance to me (hand position, three-step approach, stepping in opposition, and follow-through). When I assess, I utilize a trials method of two trials per skill. If the skill is present students receive a 1, if the skill is questionable or absent the student receives a 0. The best trial is scored for their overall grade. These skills are the focus of the unit and each receives specific feedback in the four days leading up to our overall assessment. My students know what is being assessed, what is being looked at, and how to perform each skill. I do not provide feedback during assessment, but instead utilize the specific feedback sheets after assessments have been given to share what students did well and where they can improve.

Although this post was specific to physical education, specific feedback should be given in every subject area across the spectrum. In ELA classrooms, teachers should be writing constructive and specific feedback when editing writing assignment. As the article I linked eludes to, simply writing awkward next to a sentence doesn't give the student much to work with. What about the sentences was awkward? How can they fix it? Is it the whole sentence or a small part? Is the verbiage awkward or is the sentence structure awkward? I know grading essays can take a very large chunk of time, but are we really help students writing improve by providing such vague direction? 

I personally suffered through this during my IRB process in graduate school. One professor edited my drafts and provided unspecific feedback and when it came time to turn in the final, the second professor gave me an incomplete and required me to rewrite the enter paper. Her logic was "he should have known better." So why was I, as the student, being punished for something she blatantly admitted wasn't my fault? 

Specific feedback is what helps guide students in the learning process. It allows them to process information, correct their wrongs, and move forward to more challenging topics. It is our responsibility as educators to ensure our students are able to "level up" and progress in our classrooms.


February 3, 2016

What They Told Me as a New Seller

MILESTONE ANNOUNCEMENT: For the first time since opening my store in December, I had my first back to back sales day! That's right, my Valentine's Day Fitness Bingo sold yesterday and today! My store has officially sold five items in a little over a month. Big day!

As exciting as my personal story is, I really wanted to share something that I know a lot of bloggers write about, which is how to get started on TpT. There are countless blogs, forum posts, and YouTube videos jam packed with advice, but the ocean of information is so vast, I honestly feel like many people just glance over it and don't take it seriously. I was not that type of person and listened to everything they said...


  1. GET ON THE FORUMS. If I could only give a new seller like me one piece of advice, this would be it! The forums are PACKED with information, advice, community support, and positivity. Everything you ever need to know is in the forums and if you can't find what you need, you can ask in your own forum and other sellers will flock to help you!
  2. GO PREMIUM ASAP. I kept waiting to make a sale that never came and ignored everyone telling me to go premium from the beginning. I didn't want to "waste" $69.99 on something I didn't even know would be successful. I ended up going premium and TWO DAYS LATER made my first sale! The product was $5.00 and I kept $4.45. If I had remained a basic seller, I would have made HALF!!! I've now made five sales, which may not seem like a lot, but of the $27.00 in products I've sold, I've been able to keep $22.95 as opposed to $13.50. Overtime, that missed income would really add up. Believe in yourself, believe in your store, and go premium. You won't regret it {and everyone telling you this is telling you the truth}!
  3. DESIGN YOUR COVER PAGES. Include your store logo so buyers can recognize your products in searches. Make them bright and colorful. Include picture examples of your product. Make them consistent.
  4. INVEST IN QUALITY CLIP ART. It is worth it. Clip art will also become your new obsession... As will fonts. Remember to be practical and buy what you need and wish list others you may want so you don't blow a ton of money {I'm speaking from experience here folks, this current paycheck is tight due to overspending on clip art and fonts}.
  5. PRODUCT DESCRIPTIONS. Make them short and simple, but ensure there is enough information so your buyers know exactly what they are getting. Include what is contained in the item, how you've used it, each of the components, and...
  6. PRODUCT LINKING. In your descriptions, link to other products within your store so buyers keep shopping. I have started to link to entire product categories as opposed to a single product in order to expose buyers to more of my store! Remember to use the <a href= "" > TEXT< /a> code {minus the spaces} so your links are clean and easy to use.
Sadly, it is late and I still have to finish some lessons for tomorrow since my classes moved through material faster than anticipated! The joys of having dedicated children. I hope to come back and add pictures/examples tomorrow.

Until next time,
xoxo The Sassy PE Teacher

January 30, 2016

Newest Purchases and Future Plans

Happy Saturday!

I wanted to take a moment to highlight some products I have purchased recently from other TpT sellers. I have spent the majority of my day printing, cutting, laminating, and filling out the information for these products and I genuinely feel every teacher could benefit from both of these items.

First, this Teacher Binder by Blair Turner has changed my life overnight. Yes, it looks adorable and cute, but that is only the tip of the iceberg! The options for this planner are endless. She has a custom folder included in the download so that you can make the planner exactly as you need it. I am a huge proponent of being organized and am complimented by my peers on a regular basis about my organization, but this binder has put everything I have ever done to shame. My substitute information is now so clear and easy to see. My lesson plans will soon be all in one place as opposed to various files all over my computer. I teach two subjects over three grade levels, as well as a fourth single grade level, so finding a planner that fit my needs was not easy. Set-up, printing, and creating the binder was also simple and easy. If you have never thought of using a teacher planner created by TpT, there are so many products out there that are available to fit your needs. This planner only cost $8.00, while I've seen others cost as much as $16. The more expensive binders typically have digital planners included, which is great for a lot of teachers! I prefer a hard printed version so this product worked great for me, but like I said, there as so many amazing products like this on TpT! I may even consider making my own, but that will take me quite some time, especially if I want to make it a quality product.

Secondly, I am in the process of redecorating my classroom. One of my bulletin boards focused on the Green Bay Packers and quotes by our beloved Vince Lombardi. Sadly, the Packers season has come to an end, so I believe it is time to move on to my next great idea! Ever since I started selling and buying on TpT in December, I have become slightly obsessed with flag banners. The things I have seen done with them are so adorable and perfect for my classroom. I ultimately decided to go with a grey chevron banner from Aunties Sweet Life. I enjoyed the neutral color scheme so I can match it to any color combination on my new bulletin board. I finally printed and laminated the banner set this morning and the excitement to hang them is overwhelming. Thankfully, we have a work day on Monday and my grades are already submitted! I will make sure to post pictures of the final product so you guys can see the banner in action!

Finally, I'm going to begin work on creating sports themed digital papers. I had a request from a seller earlier this week about a product line dedicated to sports digital papers and I've been doing some research all week in regards to how to make professional digital papers. I look forward to creating those and sharing them on my store soon. My biggest challenge will be finding clip art that the sellers allow use for in commercial designs as opposed to teaching products with substance. Most artist clearly state in the TOS that they do not want their clip art being used as more than 50% of the product and I would require more than that. If anyone knows of a clip art designer who allows their designs to be utilized in other design products, please let me know!

Until next time,
xoxo The Sassy PE Teacher

January 28, 2016

TpT Seller Debate: Traditional Size vs Square Cover Pages

Per usual, I was taking my daily stroll through the TpT forums and saw a new{ish} post about cover pages and whether or not it's better to keep them as traditional full pages or if it might benefit the seller to convert them to square pages. Since I am still relatively new to selling, I really feel like I need to make this decision now, as opposed to later on when I have a larger number of products.

So tonight, I want to end the debate... Traditional full page or squared covers? YOU TELL ME! Leave your vote in the comments below and check out my two cover options below.

Traditional Size

Square Size

January 27, 2016

Product Descriptions and Why They Matter

Day Four: Roads are perfectly fine, but to be safe we've been given yet another snow day. There is only so much lesson planning and TpT production a girl can handle! Needless to say, my sixth grade nutrition unit is going to be BANGIN! I can't wait to see how it goes with my students and hopefully upload it for TpT.

Speaking of TpT, I just spent the majority of the day updating my product descriptions. Why? They are the second most important piece of making a sale and mine needed a lot of work. Prior to the sitewide fix, none of my descriptions where the same, they were a tad bit messy, and I think they were losing me business. I took the liberty of looking at a number of top sellers to see what their descriptions looked like and wowsers, could I tell the difference. I tried to take inspiration from each of them to create a formula that worked for me. I wanted to take the time to share that with you!

The examples for this post will be taken from my Circulatory System Review Game.

1. The initial "grab" for my products was often a paragraph long, jumbled, and a total turn off to buyers. I took the time to shorten these introductions to keep potential buyers reading:

This Circulatory System Review Game is based on my circulatory system unit formed, with help, from Teen Health: Course 3 by Glencoe and is the prefect review game for students! 

2. After the shortened hook, I jump right into what my product is offering. I prefer to see a list format so I can go through and see exactly what I'm purchasing as buyer, so I incorporated that into my own descriptions. I also put the category in bold style so buyers can easily distinguish what they're looking at. I also include my initial pitch on commercial and personal use here, as well as a tip for buyers to view the previews before purchasing so they know exactly what they are getting:

INCLUDED ITEMS (1):
PowerPoint Presentation 
• Four Question Categories {16 Questions Total| Four per Category}
• Editable Final Jeopardy Question
• Easy Hyperlink Navigation


This set is available in a single PDF file for personal use and cannot be redistributed. Please view the thumbnail and downloadable previews to see some of the included images prior to purchasing.

3. It is said everywhere in the TpT forums to link additional products in your descriptions so potential buyers are exposed to more of your products. It is so true! I did, however, realize I was doing it all wrong. I used to link single items that were similar to the product within the description, but I've now seen that many top sellers link to an entire category of similar products! For example, in this product, I've decided to link to my health category and my integrated activities category:

RELATED PRODUCTS:
CLICK HERE to see my other health activities.
CLICK HERE to see all of my integrated physical education products.

4. Remember how I eluded to personal versus commercial use within the included items section? Well here comes the follow up, next is my terms of use section. I give a brief description about the terms and provide a link to my TOS page in my store. I uploaded it as a free download so potential buyers are able to easily see what my terms are. I also include a brief return policy:

TERMS OF USE:
Please review my TOU prior to purchasing. You may use these images for commercial or personal use, so long as you abide by those terms. You can view my TOS by clicking here. Since this is a digital file, and therefore provided as an instant download, no returns or refunds are available.

5. This next section is something I added. When it comes to providing credit, most sellers do so within their products, but I don't like this method. I feel like buyers won't scroll down to read them and the sellers who helped me create this product deserve more attention than that. So I include a credits section that links directly back to the product I used from that store:

CREDITS:
COVER BANNER
COVER FONT
6. We're almost done {promise}. Next up is file details and this is pretty standard, but a lot of the top sellers include this. I'm assuming it is because they have a higher volume of buyers and they've had multiple people contact them for tech support opening files. I hope to become a high volume buyer some day, so why not get into the habit of including this now, so I won't have to come back and do it later:

FILE DETAILS:
This product is contained in a .ZIP file. Please ensure you know how to extract/unzip the file to use it prior to purchasing.

7. A salutation is always important to ensure your buyers know you appreciate their business and the time it took them to read your descriptions. It's all about showing customers that you appreciate them!

HOPE TO SEE YOU SOON!
I hope you enjoy using this product in your own classroom as much as I have in mine! Be sure to check in to my store frequently for more freebies, design, and PE inspired products!
The Sassy PE Teacher

8. Finally, a lot of buyers may not realize that they can obtain credits from TpT for all purchased products. It's always a good idea to remind them of how to do this... It's also great for you and your store because it requires them to leave feedback on your items! Since we know your items are well made, well thought out, and amazing in general, we know your buyers will leave positive feedback! Although, even if they don't leave the best feedback, what they do leave can help you make your products that much better in the future:

*****************************************************************************
Customer Tips: 

How to get TPT credit to use on future purchases: 
•Please go to your My Purchases page (you may need to login). Beside each purchase you'll see a Provide Feedback button. Simply click it and you will be taken to a page where you can give a quick rating and leave a short comment for the product. Each time you give feedback, TPT gives you feedback credits that you use to lower the cost of your future purchases. I value your feedback greatly as it helps me determine which products are most valuable for your classroom so I can create more for you.

Be the first to know about my new discounts, freebies and product launches: 
• Look for the green star next to my store logo and click it to become a follower.

Voila! You will now receive email updates about this store.

*****************************************************************************

9. Keywords. I am new to this realm of TpT, but most of the top sellers have this stuck down on the bottom of the product. It doesn't benefit the buyer, it only benefits your store. TpT uses keywords within your product for search results, among many, many other factors. Adding keywords is not going to automatically put your product on page one of the results in a search, but it will help TpT searches identify your product as a factor for which order it posts something in.

keywords: health, health education, circulatory system, test prep, review, powerpoint, game, Sassy PE Teacher

Well, there you have it! These are the nine steps I have found to be useful when creating my own product descriptions and I hope they can help as you create your own store or go back and recreate your product descriptions.

Until next time,
xoxo The Sassy PE Teacher
 

January 23, 2016

Snow Day Productivity

Snowpocolypse Day 2: So many new products... So many new possibilities! Between what I created and the amazing products I've purchased, I am on TpT overload. Thankfully for you, I'm equally excited to share those things with you tonight.

Let's get this show on the road by sharing my own new products!

Heart Clip Art Collection | FREE

This set includes:

  • 14 Heart Images
  • 3 Different Styles {Brush Border, Handwritten, and Film}
  • PNG formatted for easy use and printing


-----------------------------------------------------------------------------------------


This set includes:

24 unique borders
4 varied base backgrouns with heart overlays
PNG formatted for easy use and printing


-----------------------------------------------------------------------------------------


This set includes:

  • 24 borders
  • 12 rectangular and 12 squared
  • PNG formatted for easy use and printing


-----------------------------------------------------------------------------------------


This is an integrated PE lesson that utilizes vocabulary to promote fitness. Students spell out words, where each letter is represented by an exercise. My students have loved it in my own classroom!

This set includes:

Game directions, setup, and variations
Alphabetical letters cards

-----------------------------------------------------------------------------------------

Aside from my own products that I've been busy creating, I have also found, purchased, and utilized many products from other sellers that I would love to take time to highlight as well.


I have searched through what feels like an endless sea of arrow clip art, a lot of which is tribal, but this set was well made and priced even better. The seller makes the product available in JPEG and PNG, it looks great in the products, and I loved it so much I remade my entire store profile utilizing them. If you are need of some awesome arrows, this is the product for you!

-----------------------------------------------------------------------------------------


TALK ABOUT A PRODUCT, I could not wait to get my hands on this one... Sadly, I had to because of that teacher pay gap over Christmas break, but I took full advantage of the TpT sale to purchase these beauties! I cannot wait to print and utilize these on my classroom bulletin board. They are so cute and perfect... They also come in teal as opposed to grey.

-----------------------------------------------------------------------------------------


I found this in a blog post recently and utilized it the next day. I feel like many teachers can identify with not being able to keep track of everything when a student is absent. For my classes, we switch between health and PE every two weeks. Over the course of two day, I teach 140 different students and I am also human... I can't even begin to tell you how many times I have forgotten to give my students their make-up work. Thankfully, they are always responsible and come ask for it, but they shouldn't have to. I already used these for two of my students and it made me feel so much more organized! It's a free download and I can't recommend it enough.\

Well that is all I have for now! It is time to take all of my new products and post them to Pinterest for others to find and hopefully purchase.

Until next time,
xoxo The Sassy PE Teacher

January 22, 2016

All About the Valentine

As we come to the end of January, we quickly begin to approach {in my opinion} one of the most fun holidays of the year, Valentine's Day! I love this holiday for school, especially physical education, because there is virtually an endless supply of topics we can cover that coincide with the day. Heart health is a huge topic, both in PE and while in health. Since the we are quickly approaching this magical day full of hearts, love, and all the feelings, I wanted to highlight a few of my products that go with the day.

Valentine's Day Fitness Bingo | $8.00

This is the most expensive product in my store, but holy moly is it worth the money! I am so thrilled about this set and incredibly proud of the hard work and detail I put into it.


This set includes:

• 40 unique bingo cards
• 7 even sets of space covers {heart shaped - 62 each}
• Instructor Call Sheet
• Directions, Set-Up, and Game Play Information
• Exercise Zones for activities that require a mat or additional space
• Multiple Bingo Calling Pattern Ideas
• PDF formatted for easy and differentiated printing


I will note that this set does require a fair amount of work on the buyers end, but once it is complete, you are going to LOVE this amazing bingo game. I highly recommend laminating everything that comes with this product.

Another physical education resource I created specifically Valentine's Day is a fitness circuit that specializes in cardiovascular fitness:


This set includes:

10 Cardiovascular Fitness Stations
Minimal Equipment Required
PNG formatted for easy use and printing
Great for grades 5 - 8


For the health classroom, I have a fun, educational review game for the circulatory system. This Jeopardy game is the perfect review tool for grades 7-9, depending on your school and curriculum.


The PowerPoint presentation includes four question categories, with four individual questions (and answers) in each. Categories include:

• Parts with Heart (reviewing parts of the heart)
• Feeling Veiny (reviewing different types of vessels)
• What's Wrong (reviewing cardiac illnesses)
• Dracula's Tastebud's (reviewing blood types)

The presentation does include a final jeopardy question that was not included in the text the other questions were taken from. You can easily change any questions or final jeopardy once you've downloaded this product to fit your needs!

In other exciting news, I now have a grand total of 13 followers on TpT! I know that probably isn't a large number to other teacher authors, especially those who have been doing this for quite some time, but it is a big deal to me! I look forward to continuing to grow and learn in this amazing community.

Until next time,
xoxo The Sassy PE Teacher

January 20, 2016

Upcoming Ideas

Happy Wednesday! We are getting ready for some winter weather here in Virginia and with that comes a much needed snow day so I can work on some awesome ideas I've been thinking of. Is it weird that I want to take my day off to do more work? Sometimes I think I'm crazy... Oh well, to each their own!

I have a few ideas cooking in the old noggin and I'm really excited to share them! With Valentine's Day approaching, I want to create some holiday specific lesson ideas. I thought a "heart hunt" would be a great addition to my store. The concept would be to have a "scavenger hunt" with seven stations and circuits. Each station would allow the students to collect a unique heart. In order to earn their heart, they must perform a cardiovascular activity and answer a question on the circulatory system in order to find their next clue station. I could even create three separate events, one for sixth, seventh, and eight grade.

Another idea I have is to create instant activity sheets, similar to my Five Large Group Games collection that I currently have on my store. I would love to continue to add similar products for various PE games.

I would also LOVE to create a Valentine's Day Bingo set for physical education as well. The only downside to this product is that there would be a lot of work for the teacher who utilizes it. They would have to cut out the cards, cut out the pieces to cover the bingo, or invest in a class set of sharpies which would force the teacher to have them laminated unless they want to reprint cards for every class which isn't practical. I love this idea, but I'm unsure of its practicality. Any ideas on this front?

Thank you for reading! If you think of any helpful suggestions, please leave me a comment!

Until next time,
xoxo. The Sassy PE Teacher

January 19, 2016

BIG DAY, BIG NEWS!

Today, I hit my first TpT milestone... I MADE MY FIRST SALE! {In the process of writing this post, I MADE MY SECOND SALE} I am thrilled beyond words that someone valued my work enough to purchase my product. It also reaffirmed my decision to upgrade to a premium seller two days ago. Needless to say, that was a smart idea!

I have also added some holiday themed materials to my store! My new product is all about promoting heart health and fitness for Valentine's Day! Check it out below...

Heart Start Fitness | $3.00

This set includes ten task cards:
• Wall Sits
• Jumping Jacks
• Mountain Climbers
• Jump Rope
• Lunges
• Push Ups
• Squat Jumps
• Crunches
• Hula Hoop
• Plank

Cover Font | Cover Clip Art | Slide Title Font | Border

Exercise Clip Art 1 | Exercise Clip Art 2 | Heart Art


I hope everyone is having a wonderful week! Good luck with the Start Your Year Inspired sale on January 20 and 21st!

Until next time,
xoxo The Sassy PE Teacher